Three.js 初探
Three.js 是一個跨瀏覽器的 JavaScript 函式庫,用於在網頁瀏覽器中創建和展示動畫的三維電腦圖形。它使用 WebGL,這是一個由瀏覽器支援的 API,允許 JavaScript 直接訪問 GPU。
three.js 提供了一個廣泛的功能,可用於創建各種三維內容,包括:基本形狀和物體、模型和場景、光照和陰影、材質和紋理、動畫和互動;它是一種流行的工具,可用於創建各種三維應用,包括:遊戲、虛擬現實和擴增實境、可視化、教育和藝術;
安裝及準備
開啟visual studio code
開一個新的專案資料夾
在vs code的Terminal[^1]輸入
npm init -ynpm init -y命令用於初始化一個新的 Node.js 專案。它會在您當前目錄中創建一個package.json檔案,該檔案包含您的專案的資訊,例如名稱、版本、描述和依賴項。
輸入
npm install vite在專案資料夾建立一個
index.html檔案在
index.html中只要輸入html,選html5,就會出現html的基本預設將
title改為適當名字在
<body>中,加係<h1>My first three js test</h1>開啟專案資料夾中的
package.json,將script部分修改為:
"scripts": {
  "dev": "vite",
  "build": "vite build"
},在terminal輸入
npm run時,就會run上面這再個script在terminal輸入:
npm run dev,這時就會運行vite這時會彈出一個localhost的地址,按
ctrl按下這個地址就會開啟,你就會見到網頁內容
測試script.js
- 在專案資料夾建立一個
script.js - 在內容加入以下內容測試:
console.log('Hello World')- 在
index.html中,在<body>加入<script>如下:
<!DOCTYPE html>
<html lang="en">
<head>
    <meta charset="UTF-8">
    <meta name="viewport" content="width=device-width, initial-scale=1.0">
    <title>First Three Js</title>
</head>
<body>
    <h1>My first three js test</h1>
    <script src="./script.js" type="module"></script>
</body>
</html>- 可以返回網頁,按
option + cmd + i,就可以開啟開發人員工具,見到Hello World
安裝three.js
在terminal按下
ctrl + c(即使macOS也是)輸入
npm install three將
script.js修改為:javascriptimport * as THREE from 'three' console.log(THREE)儲存後就可以在網頁console見到內容,即匯入成功。
建立簡單場景
在
index.html中新增sytle,將margin設為0html<!DOCTYPE html> <html lang="en"> <head> <meta charset="UTF-8"> <meta name="viewport" content="width=device-width, initial-scale=1.0"> <title>First Three Js</title> <style> body { margin: 0; } </style> </head> <body> <script src="./script.js" type="module"></script> </body> </html>返回
scripts.js中javascriptimport * as THREE from 'three'; // 建立一個 WebGL 渲染器的程式碼 const renderer = new THREE.WebGLRenderer(); // 設定渲染器的尺寸 renderer.setSize(window.innerWidth, window.innerHeight); // 將 WebGL 渲染器的畫布元素添加到網頁的 body 元素中 document.body.appendChild(renderer.domElement);在瀏覽器中開始就會出現一個空白的頁面,這是正常的,因還沒有任何物件
建立場景、相機並渲染場景
import * as THREE from 'three';

// 建立一個 WebGL 渲染器的程式碼
const renderer = new THREE.WebGLRenderer();
// 設定渲染器的尺寸
renderer.setSize(window.innerWidth, window.innerHeight);
// 將 WebGL 渲染器的畫布元素添加到網頁的 body 元素中
document.body.appendChild(renderer.domElement);
// 建立一個場景
const scene = new THREE.Scene();
// 建立一個透視相機
const camera = new THREE.PerspectiveCamera(
    75, // 視野角度
    window.innerWidth / window.innerHeight, //
    0.1, // 視野最近距離
    1000 // 視野最遠距離
);
// 將場景渲染到畫布元素上的函式
renderer.render(scene, camera);在
scripts.js續寫:javascript// 建立一個場景 const scene = new THREE.Scene(); // 建立一個透視相機 const camera = new THREE.PerspectiveCamera( 75, // 視野角度 window.innerWidth / window.innerHeight, // 0.1, // 視野最近距離 1000 // 視野最遠距離 ); // 將場景渲染到畫布元素上的函式 renderer.render(scene, camera);儲存後畫面會變黑,但還是沒有其他變化
加入三維座標軸
import * as THREE from 'three';

// 建立一個 WebGL 渲染器的程式碼
const renderer = new THREE.WebGLRenderer();
// 設定渲染器的尺寸
renderer.setSize(window.innerWidth, window.innerHeight);
// 將 WebGL 渲染器的畫布元素添加到網頁的 body 元素中
document.body.appendChild(renderer.domElement);

// 建立一個場景
const scene = new THREE.Scene();
// 建立一個透視相機
const camera = new THREE.PerspectiveCamera(
    75, // 視野角度
    window.innerWidth / window.innerHeight, //
    0.1, // 視野最近距離
    1000 // 視野最遠距離
);

// 建立三維坐標系輔助器
const axesHelper = new THREE.AxesHelper(5);
scene.add(axesHelper);
// 改變相機的位置
camera.position.set(0, 2, 5);

// 將場景渲染到畫布元素上的函式
renderer.render(scene, camera);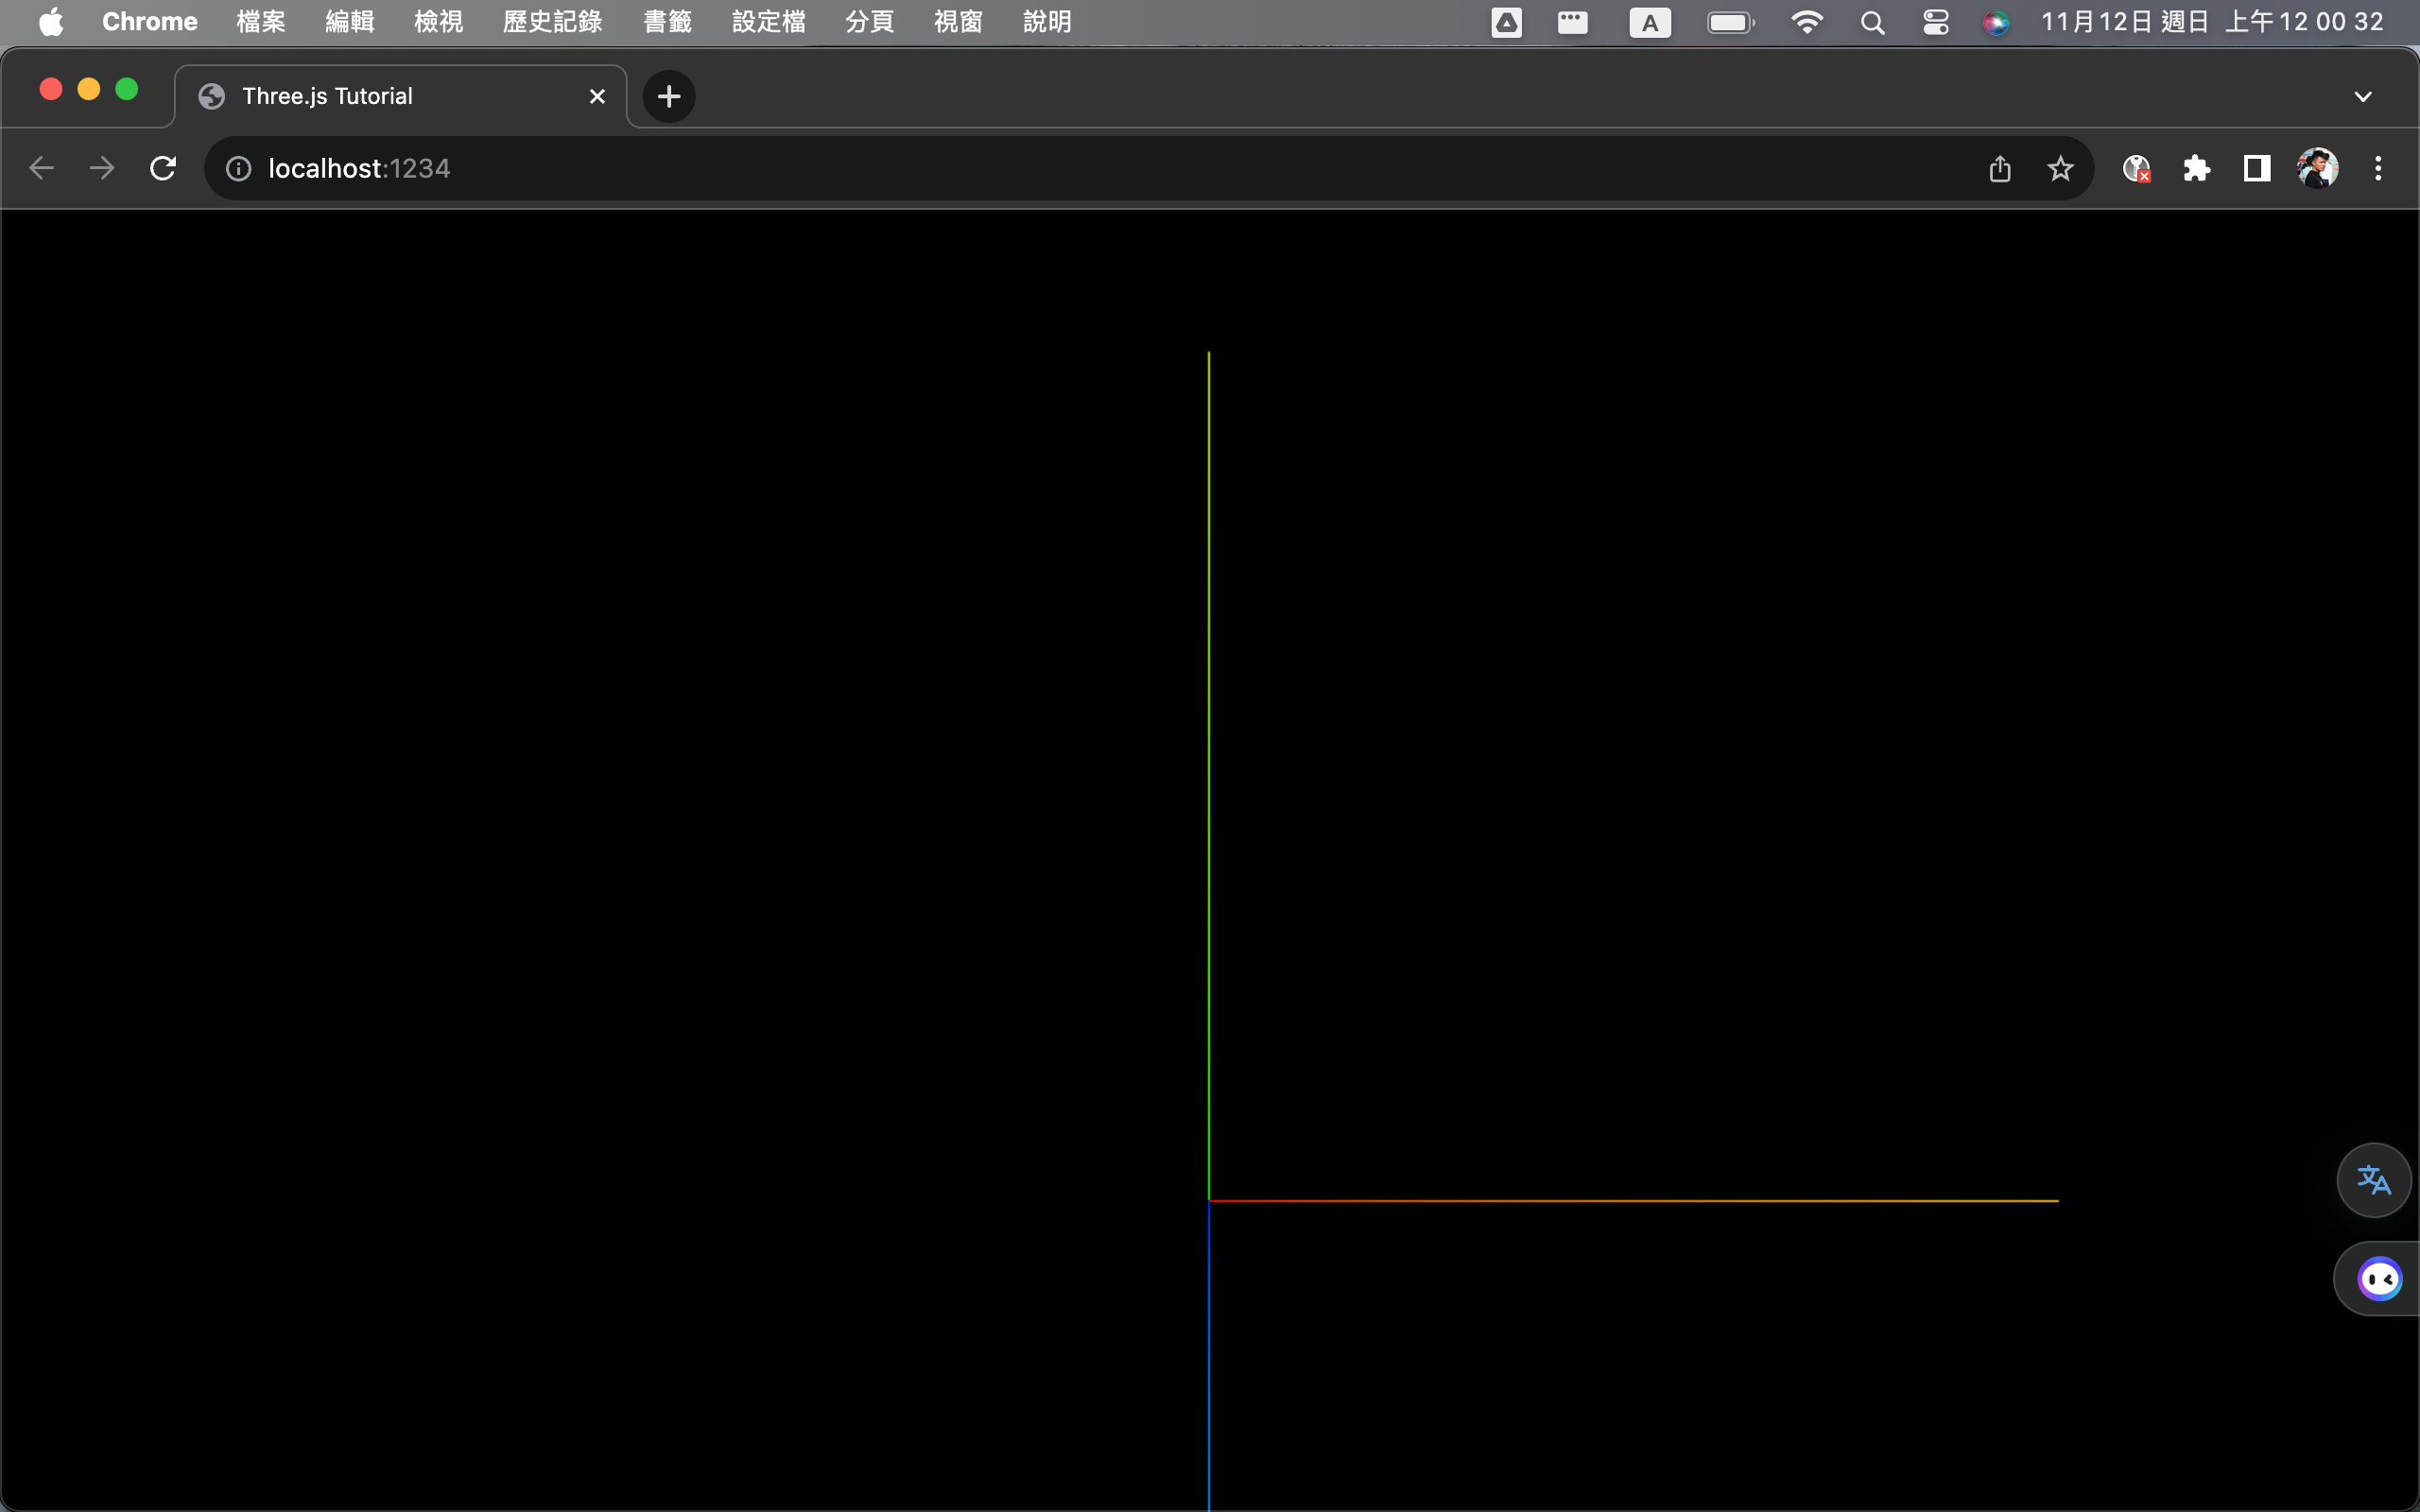
新增:
javascript// 建立三維坐標系輔助器 const axesHelper = new THREE.AxesHelper(5); scene.add(axesHelper); // 改變相機的位置 camera.position.set(0, 2, 5);const axesHelper = new THREE.AxesHelper(5);這段程式碼會建立一個三維坐標系輔助器,並將其大小設定為 5。三維坐標系輔助器是 three.js 中一種用於在三維場景中渲染三維坐標系的物件。它由三根線段組成,分別代表 X、Y、Z 軸。scene.add(axesHelper);這段程式碼會將三維坐標系輔助器添加到場景中。camera.position.set(0, 2, 5);這段程式碼會改變相機的位置。相機的位置將位於原點的正前方 5 個單位,正上方 2 個單位。
建立一個立方體
import * as THREE from 'three';
// 建立一個 WebGL 渲染器的程式碼
const renderer = new THREE.WebGLRenderer();
// 設定渲染器的尺寸
renderer.setSize(window.innerWidth, window.innerHeight);
// 將 WebGL 渲染器的畫布元素添加到網頁的 body 元素中
document.body.appendChild(renderer.domElement);
// 建立一個場景
const scene = new THREE.Scene();
// 建立一個透視相機
const camera = new THREE.PerspectiveCamera(
75, // 視野角度
window.innerWidth / window.innerHeight, //
0.1, // 視野最近距離
1000 // 視野最遠距離
);
// 建立三維坐標系輔助器
const axesHelper = new THREE.AxesHelper(5);
scene.add(axesHelper);
// 改變相機的位置
camera.position.set(0, 2, 5);
// 建立一個立方體
const boxGeometry = new THREE.BoxGeometry();
const boxMaterial = new THREE.MeshBasicMaterial({color: 0x00ff00});
const box = new THREE.Mesh(boxGeometry, boxMaterial);
scene.add(box);
// 將場景渲染到畫布元素上的函式
renderer.render(scene, camera);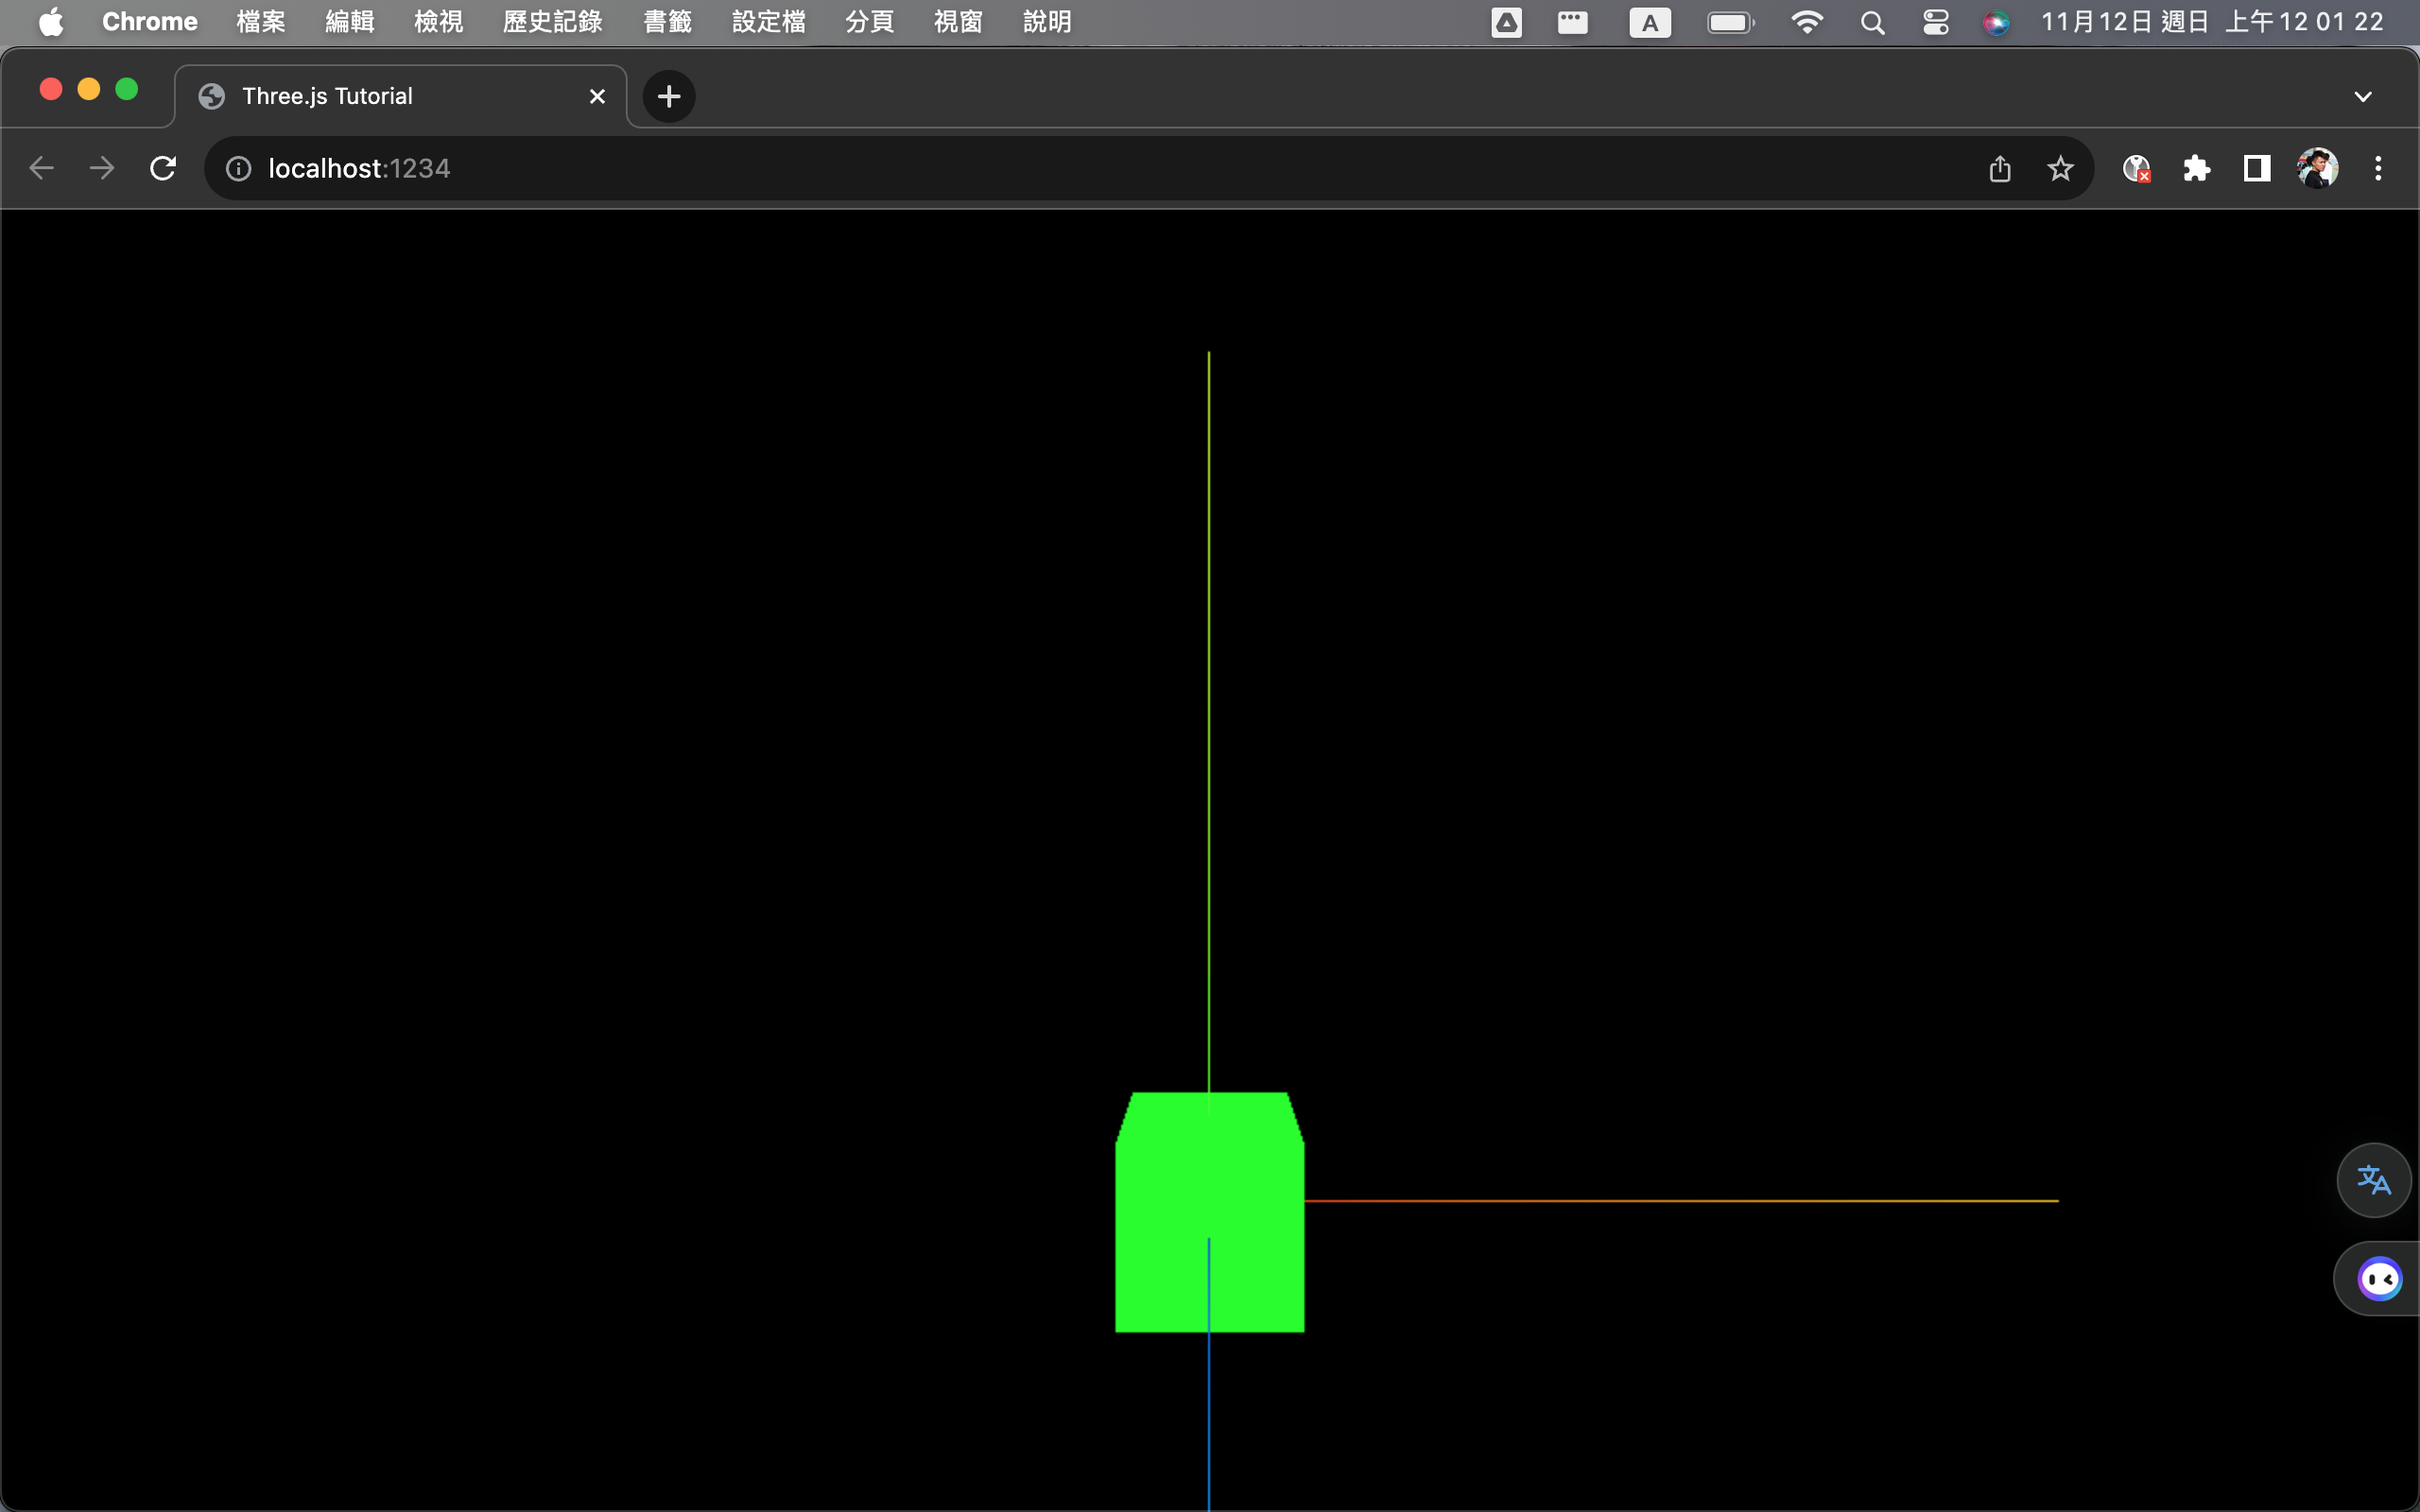
新增:
javascript// 建立一個立方體 const boxGeometry = new THREE.BoxGeometry(); const boxMaterial = new THREE.MeshBasicMaterial({color: 0x00ff00}); const box = new THREE.Mesh(boxGeometry, boxMaterial); scene.add(box);const boxGeometry = new THREE.BoxGeometry();會建立一個立方體的幾何體。立方體的幾何體由六個面組成,每個面都是一個正方形。const boxMaterial = new THREE.MeshBasicMaterial({color: 0x00ff00});會建立一個立方體的材質。材質控制了立方體的外觀。在這個例子中,材質的顏色設定為綠色。const box = new THREE.Mesh(boxGeometry, boxMaterial);會建立一個立方體物件。立方體物件由幾何體和材質組成。scene.add(box);會將立方體物件添加到場景中。
令立方體旋轉
import * as THREE from 'three';

// 建立一個 WebGL 渲染器的程式碼
const renderer = new THREE.WebGLRenderer();
// 設定渲染器的尺寸
renderer.setSize(window.innerWidth, window.innerHeight);
// 將 WebGL 渲染器的畫布元素添加到網頁的 body 元素中
document.body.appendChild(renderer.domElement);

// 建立一個場景
const scene = new THREE.Scene();
// 建立一個透視相機
const camera = new THREE.PerspectiveCamera(
    75, // 視野角度
    window.innerWidth / window.innerHeight, //
    0.1, // 視野最近距離
    1000 // 視野最遠距離
);

// 建立三維坐標系輔助器
const axesHelper = new THREE.AxesHelper(5);
scene.add(axesHelper);
// 改變相機的位置
camera.position.set(0, 2, 5);

// 建立一個立方體
const boxGeometry = new THREE.BoxGeometry();
const boxMaterial = new THREE.MeshBasicMaterial({ color: 0x00ff00 });
const box = new THREE.Mesh(boxGeometry, boxMaterial);
scene.add(box);

function animate(time) {
    box.rotation.x = time/1000;
    box.rotation.y = time/1000;
    // 將場景渲染到畫布元素上的函式
    renderer.render(scene, camera);
}
renderer.setAnimationLoop(animate);新增和修改:
javascriptfunction animate(time) { box.rotation.x = time/1000; box.rotation.y = time/1000; // 將場景渲染到畫布元素上的函式 renderer.render(scene, camera); } renderer.setAnimationLoop(animate);這段程式碼首先定義一個
animate()函式。這個函式會接受一個time參數,該參數表示當前時間。函式的程式碼首先設定立方體的 X 軸旋轉角度。旋轉角度為
time除以 1000。然後,函式設定立方體的 Y 軸旋轉角度。旋轉角度也為
time除以 1000。最後,函式調用
renderer.render()函式,將場景渲染到畫布元素上。
OrbitControls 控制鏡頭
import * as THREE from 'three';
import { OrbitControls } from 'three/examples/jsm/controls/OrbitControls.js';
// 建立一個 WebGL 渲染器的程式碼
const renderer = new THREE.WebGLRenderer();
// 設定渲染器的尺寸
renderer.setSize(window.innerWidth, window.innerHeight);
// 將 WebGL 渲染器的畫布元素添加到網頁的 body 元素中
document.body.appendChild(renderer.domElement);
// 建立一個場景
const scene = new THREE.Scene();
// 建立一個透視相機
const camera = new THREE.PerspectiveCamera(
75, // 視野角度
window.innerWidth / window.innerHeight, //
0.1, // 視野最近距離
1000 // 視野最遠距離
);
// 建立一個輔助器
const orbit = new OrbitControls(camera, renderer.domElement);
// 建立三維坐標系輔助器
const axesHelper = new THREE.AxesHelper(5);
scene.add(axesHelper);
// 改變相機的位置
camera.position.set(0, 2, 5);
// 更新相機的控制器
orbit.update();
// 建立一個立方體
const boxGeometry = new THREE.BoxGeometry();
const boxMaterial = new THREE.MeshBasicMaterial({ color: 0x00ff00 });
const box = new THREE.Mesh(boxGeometry, boxMaterial);
scene.add(box);
function animate(time) {
box.rotation.x = time/1000;
box.rotation.y = time/1000;
// 將場景渲染到畫布元素上的函式
renderer.render(scene, camera);
}
renderer.setAnimationLoop(animate);新增:
javascriptimport { OrbitControls } from 'three/examples/jsm/controls/OrbitControls.js'; const orbit = new OrbitControls(camera, renderer.domElement); orbit.update();這段程式碼是使用Three.js庫中的OrbitControls模組來創建一個軌道控制器,以便在三維場景中控制相機的移動和旋轉。
新增平面和圓
import * as THREE from 'three';
import { OrbitControls } from 'three/examples/jsm/controls/OrbitControls.js';

// 建立一個 WebGL 渲染器的程式碼
const renderer = new THREE.WebGLRenderer({ antialias: true });
// 設定渲染器的尺寸
renderer.setSize(window.innerWidth, window.innerHeight);
// 設定渲染器的解析度
renderer.setPixelRatio(window.devicePixelRatio);
// 將 WebGL 渲染器的畫布元素添加到網頁的 body 元素中
document.body.appendChild(renderer.domElement);

// 建立一個場景
const scene = new THREE.Scene();
// 建立一個透視相機
const camera = new THREE.PerspectiveCamera(
    45, // 視野角度
    window.innerWidth / window.innerHeight, //
    0.1, // 視野最近距離
    1000 // 視野最遠距離
);

// 建立一個輔助器
const orbit = new OrbitControls(camera, renderer.domElement);

// 建立三維坐標系輔助器
const axesHelper = new THREE.AxesHelper(5);
scene.add(axesHelper);
// 改變相機的位置
camera.position.set(-10, 30, 30);
// 更新相機的控制器
orbit.update();

// 建立一個立方體
const boxGeometry = new THREE.BoxGeometry();
const boxMaterial = new THREE.MeshBasicMaterial({ color: 0x00ff00 });
const box = new THREE.Mesh(boxGeometry, boxMaterial);
scene.add(box);

// 建立一個平面
const planeGeometry = new THREE.PlaneGeometry(30, 30);
const planeMaterial = new THREE.MeshBasicMaterial({
    color: 0xcccccc, side: THREE.DoubleSide
});
const plane = new THREE.Mesh(planeGeometry, planeMaterial);
scene.add(plane);
plane.rotation.x = -Math.PI / 2;

// 建立網格, 30 是網格的大小, 20 是網格的分段數
const gridHelper = new THREE.GridHelper(30, 20);
scene.add(gridHelper);

// 建立一個球體, 5 是球體的半徑, 30, 30 是球體的寬度分段數和高度分段數
const sphereGeometry = new THREE.SphereGeometry(5, 30, 30);
const sphereMaterial = new THREE.MeshBasicMaterial({
    color: 0x0000FF, wireframe: true
});
const sphere = new THREE.Mesh(sphereGeometry, sphereMaterial);
scene.add(sphere);


function animate(time) {
    box.rotation.x = time / 1000;
    box.rotation.y = time / 1000;
    // 將場景渲染到畫布元素上的函式
    renderer.render(scene, camera);
}
renderer.setAnimationLoop(animate);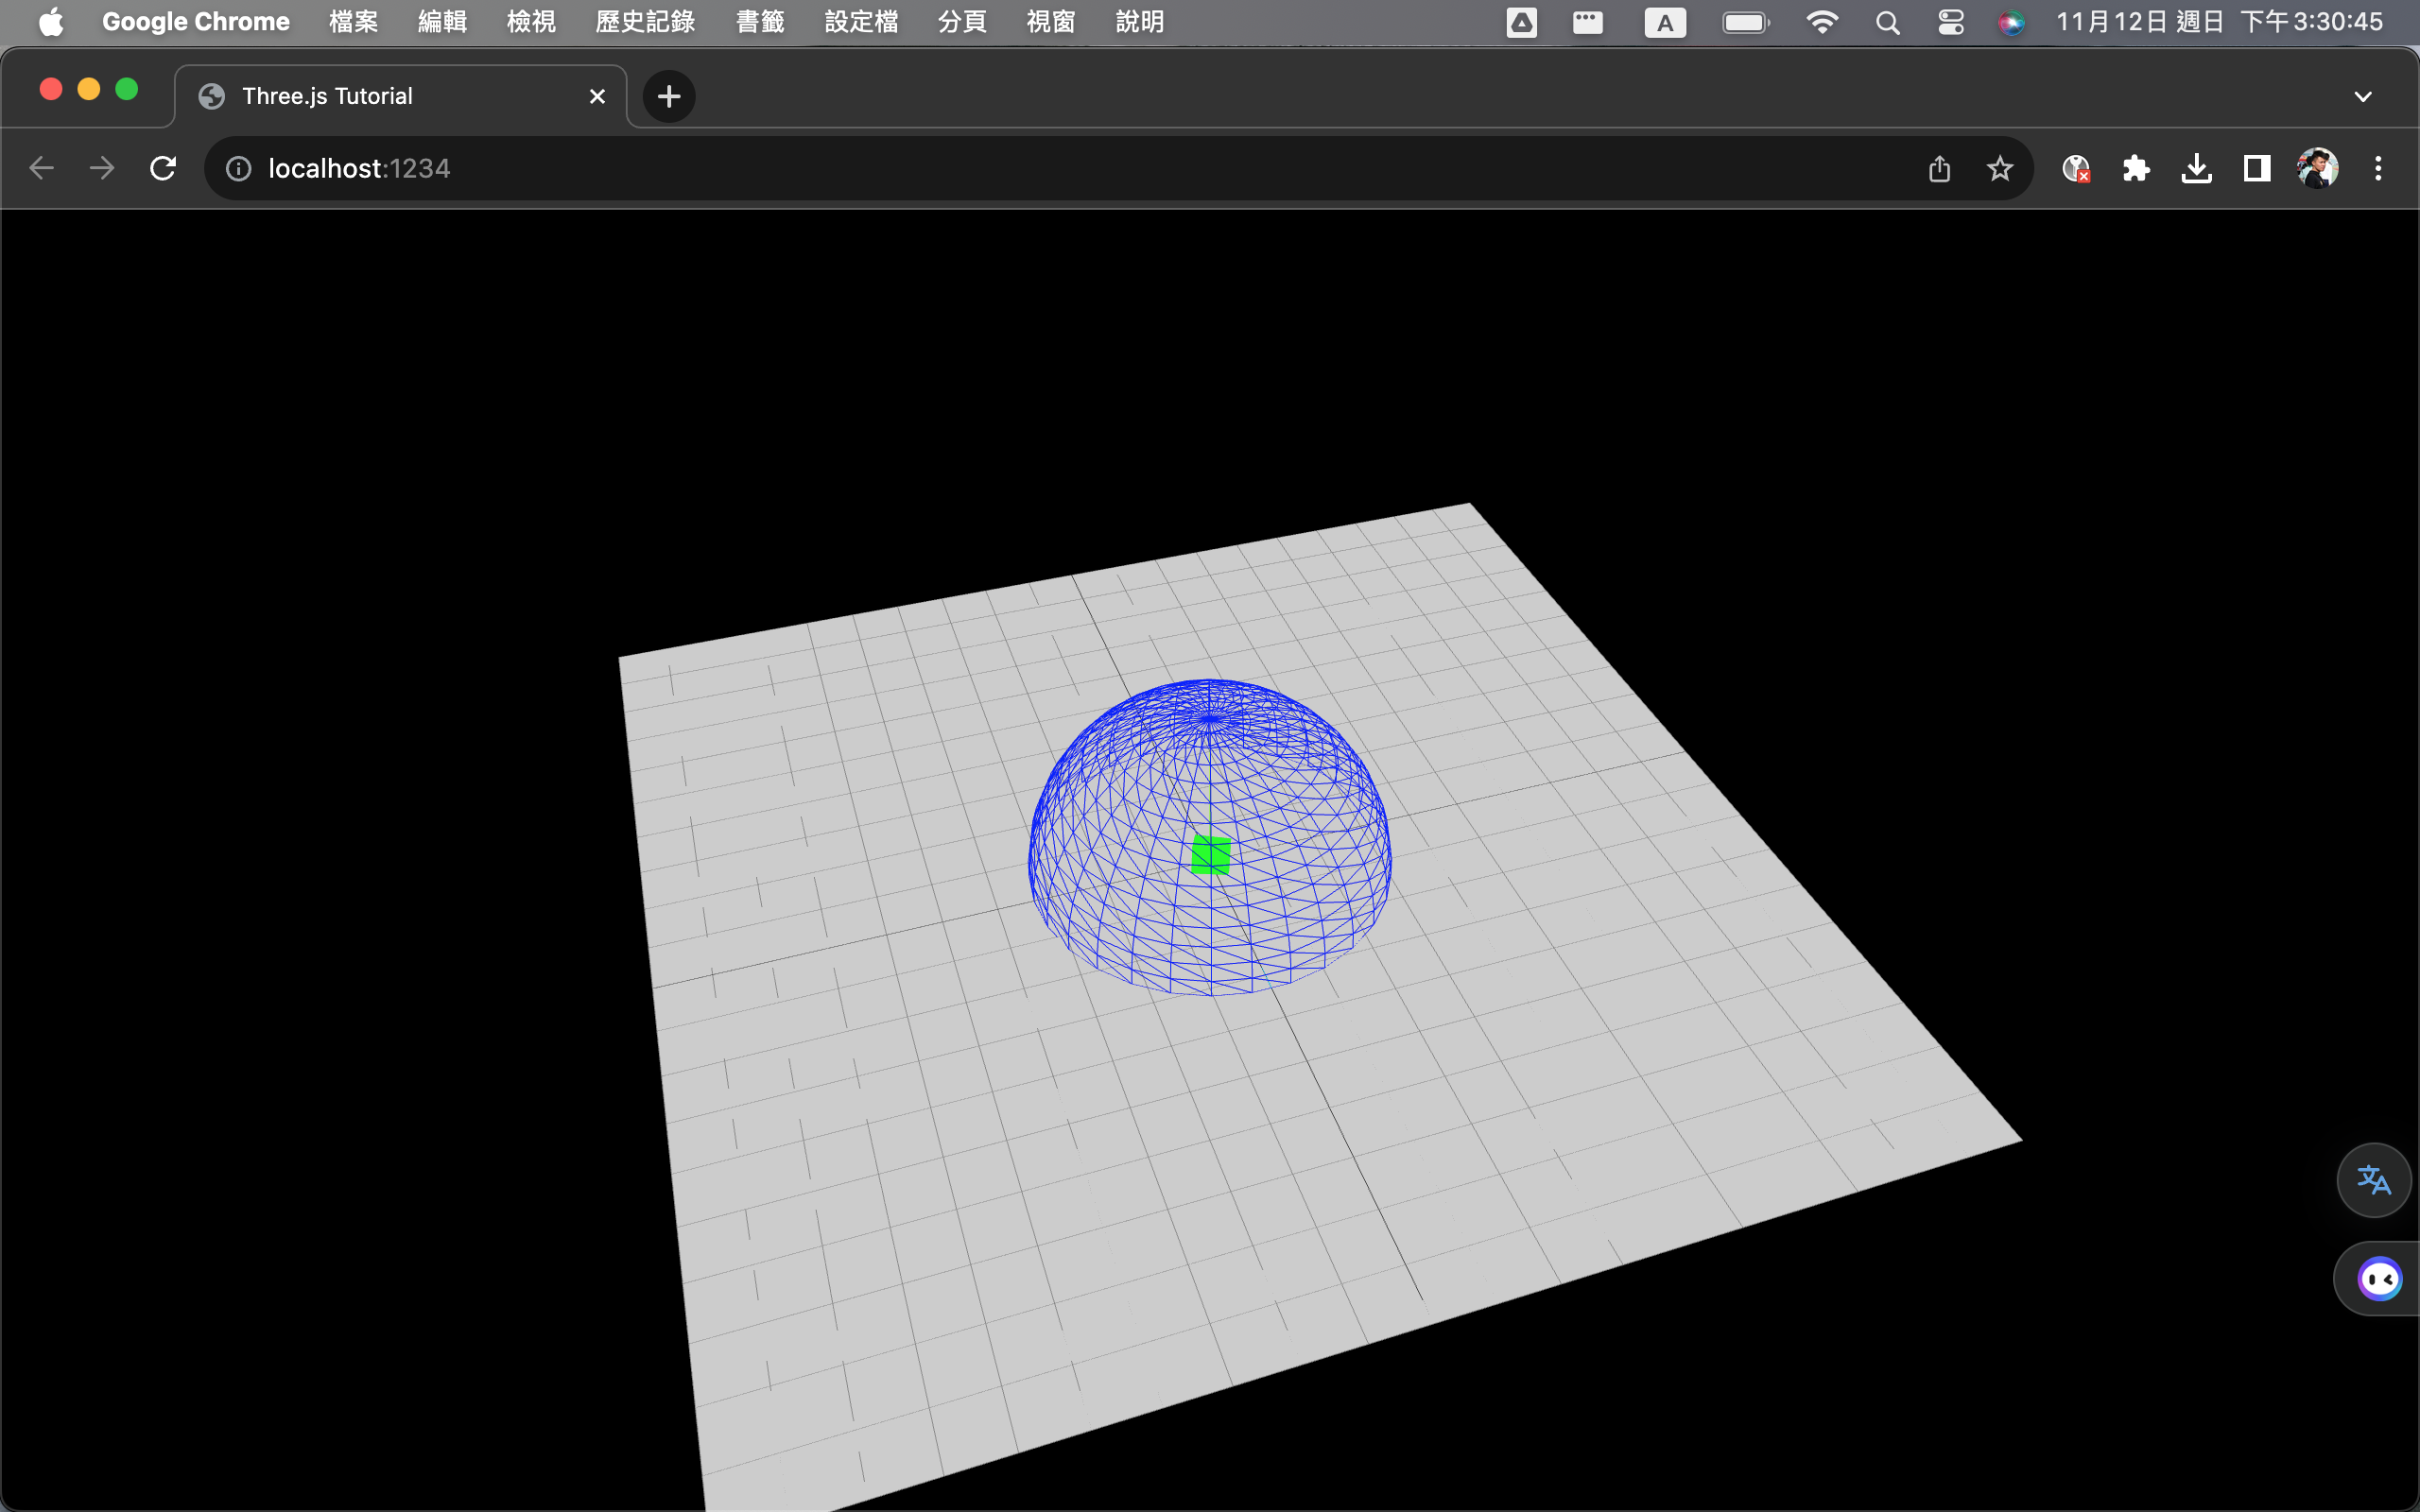
新增:
javascript// 建立一個平面 const planeGeometry = new THREE.PlaneGeometry(30, 30); const planeMaterial = new THREE.MeshBasicMaterial({ color: 0xcccccc, side: THREE.DoubleSide }); const plane = new THREE.Mesh(planeGeometry, planeMaterial); scene.add(plane); plane.rotation.x = -Math.PI / 2; // 建立網格, 30 是網格的大小, 20 是網格的分段數 const gridHelper = new THREE.GridHelper(30, 20); scene.add(gridHelper); // 建立一個球體, 5 是球體的半徑, 30, 30 是球體的寬度分段數和高度分段數 const sphereGeometry = new THREE.SphereGeometry(5, 30, 30); const sphereMaterial = new THREE.MeshBasicMaterial({ color: 0x0000FF, wireframe: true }); const sphere = new THREE.Mesh(sphereGeometry, sphereMaterial); scene.add(sphere);這段程式碼使用Three.js創建了一個簡單的場景,包含了一個平面、一個網格和一個球體。它們被添加到場景中以進行渲染。
- 平面:創建一個平面,設置寬度和高度為30,顏色為淺灰色,並添加到場景中。
- 網格:創建一個網格幫助器,設置大小為30,分段數為20,並添加到場景中。
- 球體:創建一個球體,設置半徑為5,寬度分段數和高度分段數均為30,顏色為藍色,並以線框模式渲染。將球體添加到場景中。
Three.js材質
three.js 材料是用來控制三維物體外觀和行為的物件。但部分材質需要配合光源才能顯示。three.js 提供了各種類型的材料,包括:
- MeshBasicMaterial:這是最基本的材料類型,它可以用來指定物體的顏色、透明度和反光率。
- MeshPhongMaterial:這種材料可以用來創建更逼真的物體外觀,它提供了更複雜的光照模型。
- MeshLambertMaterial:這種材料類似於 MeshPhongMaterial,但它使用了更簡單的光照模型,因此速度更快。
- MeshToonMaterial:這種材料可以用來創建卡通風格的物體外觀。
- MeshNormalMaterial:這種材料可以用來顯示物體的法線。
three.js 材料還提供了許多屬性,可以用來控制物體的外觀和行為,例如:
- color:物體的顏色。
- transparent:物體的透明度。
- reflectivity:物體的反光率。
- shininess:物體的光澤度。
- ambient:物體的環境光照強度。
- diffuse:物體的散射光照強度。
- specular:物體的鏡面光照強度。
- emissive:物體的自發光強度。
- wireframe:是否顯示物體的線框。
- wireframeLinewidth:線框的寬度。
three.js 材料可以使用 Mesh.setMaterial() 方法來設定給網格。
以下是一個使用 MeshBasicMaterial 的範例:
const geometry = new THREE.BoxGeometry();
const material = new THREE.MeshBasicMaterial({ color: 0xff0000 });
const cube = new THREE.Mesh(geometry, material);

scene.add(cube);這段程式碼會創建一個紅色的立方體。
以下是一個使用 MeshPhongMaterial 的範例:
const geometry = new THREE.BoxGeometry();
const material = new THREE.MeshPhongMaterial({
  color: 0xff0000,
  specular: 0x00ff00,
  shininess: 100,
});
const cube = new THREE.Mesh(geometry, material);

scene.add(cube);這段程式碼會創建一個具有紅色主體和綠色高光的立方體。
three.js 材料提供了許多功能,可以用來創建各種各樣的三維物體外觀。
你可以根據自己的需要選擇合適的材料來創建三維物體。
新增dat.gui
dat.gui是JavaScript庫,用於創建簡單的用戶界面,方便調整和控制網頁應用程序中的參數和選項。它提供輕量級的交互式控制面板,用於快速修改應用程序的參數。
- 按下
CMD+J開啟Terminal - 在Terminal 中按下
CTRL+C(在mac境景下)停止Parcel - 輸入
npm install dat.gui - 安裝好後再次輸入
npm rum dev
import * as THREE from 'three';
import { OrbitControls } from 'three/examples/jsm/controls/OrbitControls.js';
import * as dat from 'dat.gui';

// 建立一個 WebGL 渲染器的程式碼, antialias 是抗鋸齒的意思
const renderer = new THREE.WebGLRenderer({ antialias: true });
// 設定渲染器的尺寸
renderer.setSize(window.innerWidth, window.innerHeight);
// 設定渲染器的解析度
renderer.setPixelRatio(window.devicePixelRatio);
// 將 WebGL 渲染器的畫布元素添加到網頁的 body 元素中
document.body.appendChild(renderer.domElement);

// 建立一個場景
const scene = new THREE.Scene();
// 建立一個透視相機
const camera = new THREE.PerspectiveCamera(
    45, // 視野角度
    window.innerWidth / window.innerHeight, //
    0.1, // 視野最近距離
    1000 // 視野最遠距離
);

// 建立一個輔助器
const orbit = new OrbitControls(camera, renderer.domElement);

// 建立三維坐標系輔助器
const axesHelper = new THREE.AxesHelper(5);
scene.add(axesHelper);
// 改變相機的位置
camera.position.set(-10, 30, 30);
// 更新相機的控制器
orbit.update();

// 建立一個立方體
const boxGeometry = new THREE.BoxGeometry();
const boxMaterial = new THREE.MeshBasicMaterial({ color: 0x00ff00 });
const box = new THREE.Mesh(boxGeometry, boxMaterial);
scene.add(box);

// 建立一個平面
const planeGeometry = new THREE.PlaneGeometry(30, 30);
const planeMaterial = new THREE.MeshBasicMaterial({
    color: 0xcccccc, side: THREE.DoubleSide
});
const plane = new THREE.Mesh(planeGeometry, planeMaterial);
scene.add(plane);
plane.rotation.x = -Math.PI / 2;

// 建立網格, 30 是網格的大小, 20 是網格的分段數
const gridHelper = new THREE.GridHelper(30, 20);
scene.add(gridHelper);

// 建立一個球體, 5 是球體的半徑, 30, 30 是球體的寬度分段數和高度分段數
const sphereGeometry = new THREE.SphereGeometry(5, 30, 30);
const sphereMaterial = new THREE.MeshBasicMaterial({
    color: 0x0000FF, wireframe: false
});
const sphere = new THREE.Mesh(sphereGeometry, sphereMaterial);
sphere.position.set(0, 10, 10);
scene.add(sphere);

// 建立gui
const gui = new dat.GUI();
// 建立一個物件, 用來儲存控制項的資料
const options = {
    sphereColor: 0xffea00,
    wireframe: false,
    speed : 0.01
};
// 將控制項加入gui
gui.addColor(options, 'sphereColor').onChange(function (value) {
    sphere.material.color.set(value);
});
gui.add(options, 'wireframe').onChange(function (value) {
    sphere.material.wireframe = value;
});
gui.add(options, 'speed', 0, 0.1);

let step = 0;

function animate(time) {
    box.rotation.x = time / 1000;
    box.rotation.y = time / 1000;

    step += options.speed;
    sphere.position.y = 10 * Math.sin(step);

    // 將場景渲染到畫布元素上的函式
    renderer.render(scene, camera);
}
renderer.setAnimationLoop(animate);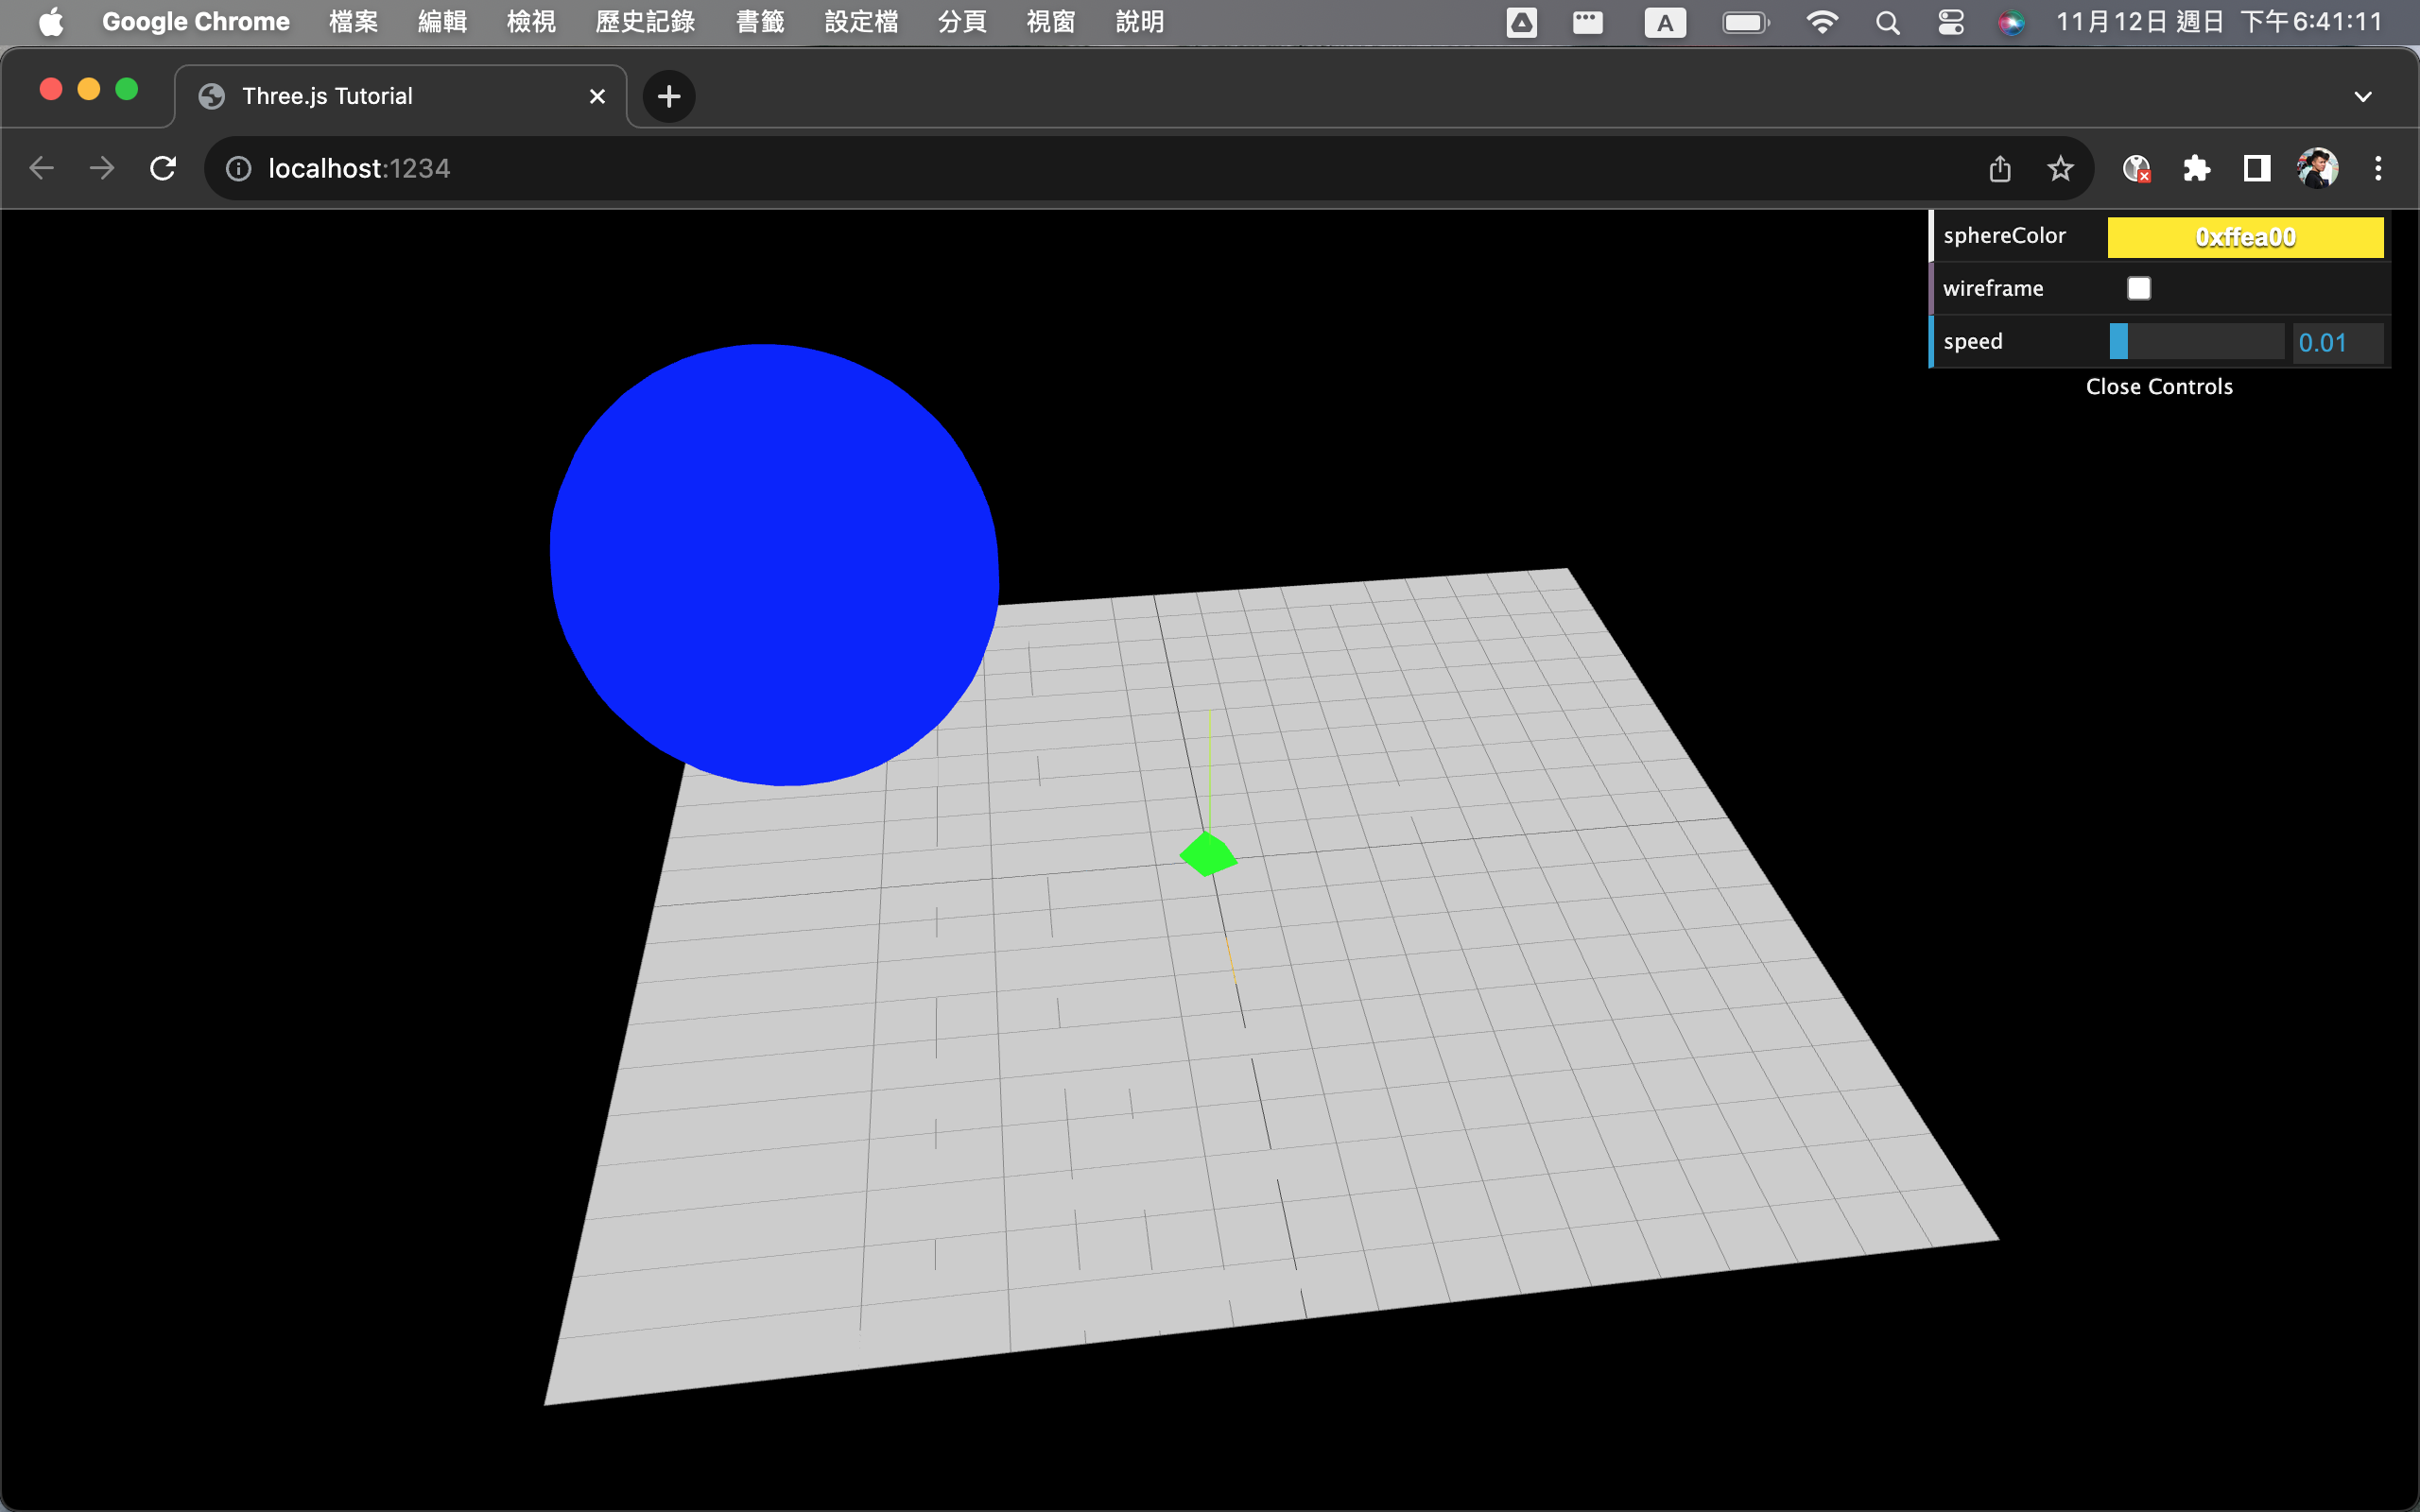
在JavaScript中導入dat.gui
javascriptimport * as dat from 'dat.gui';建立GUI物件:
```javascript// 建立gui const gui = new dat.GUI(); // 建立一個物件, 用來儲存控制項的資料 const options = { sphereColor: 0xffea00, wireframe: false, speed : 0.01 }; // 將控制項加入gui gui.addColor(options, 'sphereColor').onChange(function (value) { sphere.material.color.set(value); }); gui.add(options, 'wireframe').onChange(function (value) { sphere.material.wireframe = value; }); gui.add(options, 'speed', 0, 0.1);
創建了一個dat.gui界面,並建立了一個名為options的物件來存儲控制項的資料。透過gui.add方法,將控制項加入gui界面。其中包括一個顏色選擇器控制項,用於調整球體的顏色;一個開關控制項,用於切換球體的線框模式;以及一個滑塊控制項,用於調整速度值。每個控制項的變化都會觸發相應的回調函數,從而實現對應的操作,例如修改球體的顏色或線框模式,以及調整速度值的範圍。
javascriptstep += options.speed;控制項也可以作為一個獨立的變數來應用
光源
Three.js中有幾種常見的光源類型:
AmbientLight(環境光):均勻地照亮場景中的所有物體,不考慮方向和位置。DirectionalLight(方向光):模擬無窮遠處的光源,具有方向和強度,如太陽光。它會投射平行光線,並影響場景中所有物體的陰影。PointLight(點光源):模擬從一個點向所有方向發射的光源,如燈泡。它會向四面八方發射光線,並在場景中產生明暗效果。SpotLight(聚光燈):模擬具有特定方向和範圍的光源,如手電筒。它會向指定方向發射光線,並在指定範圍內集中光線,產生明亮的聚光效果。
import * as THREE from 'three';
import { OrbitControls } from 'three/examples/jsm/controls/OrbitControls.js';
import * as dat from 'dat.gui';

// 建立一個 WebGL 渲染器的程式碼, antialias 是抗鋸齒的意思
const renderer = new THREE.WebGLRenderer({ antialias: true });
// 設定渲染器的尺寸
renderer.setSize(window.innerWidth, window.innerHeight);
// 設定渲染器的解析度
renderer.setPixelRatio(window.devicePixelRatio);
// 將 WebGL 渲染器的畫布元素添加到網頁的 body 元素中
document.body.appendChild(renderer.domElement);

// 建立一個場景
const scene = new THREE.Scene();
// 建立一個透視相機
const camera = new THREE.PerspectiveCamera(
    45, // 視野角度
    window.innerWidth / window.innerHeight, //
    0.1, // 視野最近距離
    1000 // 視野最遠距離
);

// 建立一個輔助器
const orbit = new OrbitControls(camera, renderer.domElement);

// 建立三維坐標系輔助器
const axesHelper = new THREE.AxesHelper(5);
scene.add(axesHelper);
// 改變相機的位置
camera.position.set(-10, 30, 30);
// 更新相機的控制器
orbit.update();


// 建立gui
const gui = new dat.GUI();
// 建立一個物件, 用來儲存控制項的資料
const options = {
    sphereColor: 0xffea00,
    wireframe: false,
    speed: 0.01
};
// 將控制項加入gui
gui.addColor(options, 'sphereColor').onChange(function (value) {
    sphere.material.color.set(value);
});
gui.add(options, 'wireframe').onChange(function (value) {
    sphere.material.wireframe = value;
});
gui.add(options, 'speed', 0, 0.1);


// 建立一個立方體
const boxGeometry = new THREE.BoxGeometry();
const boxMaterial = new THREE.MeshStandardMaterial({ color: 0x00ff00 });
const box = new THREE.Mesh(boxGeometry, boxMaterial);
scene.add(box);

// 建立一個平面
const planeGeometry = new THREE.PlaneGeometry(30, 30);
const planeMaterial = new THREE.MeshStandardMaterial({
    color: 0xcccccc, side: THREE.DoubleSide
});
const plane = new THREE.Mesh(planeGeometry, planeMaterial);
scene.add(plane);
plane.rotation.x = -Math.PI / 2;

// 建立網格, 30 是網格的大小, 20 是網格的分段數
const gridHelper = new THREE.GridHelper(30, 20);
scene.add(gridHelper);

// 建立一個球體, 5 是球體的半徑, 30, 30 是球體的寬度分段數和高度分段數
const sphereGeometry = new THREE.SphereGeometry(5, 30, 30);
const sphereMaterial = new THREE.MeshStandardMaterial({
    color: 0x0000FF, wireframe: false
});
const sphere = new THREE.Mesh(sphereGeometry, sphereMaterial);
sphere.position.set(0, 10, 10);
scene.add(sphere);

// 建立環境光源, 0x333333 是光源的顏色
const ambientLight = new THREE.AmbientLight(0x333333);
scene.add(ambientLight);
// 建立平行光源, 0.8 是光源的強度, 光源的強度是 0.0 ~ 1.0 的值
const directionalLight = new THREE.DirectionalLight(0xffffff, 0.8);
directionalLight.position.set(-30, 50, 0);
scene.add(directionalLight);

// 建立平行光源助手, 其中的參數是平行光源對象, 5 是輔助線的長度
const directionalLightHelper = new THREE.DirectionalLightHelper(directionalLight, 5);
scene.add(directionalLightHelper);

let step = 0;

function animate(time) {
    box.rotation.x = time / 1000;
    box.rotation.y = time / 1000;

    step += options.speed;
    sphere.position.y = 10 * Math.abs(Math.sin(step));

    // 將場景渲染到畫布元素上的函式
    renderer.render(scene, camera);
}
renderer.setAnimationLoop(animate);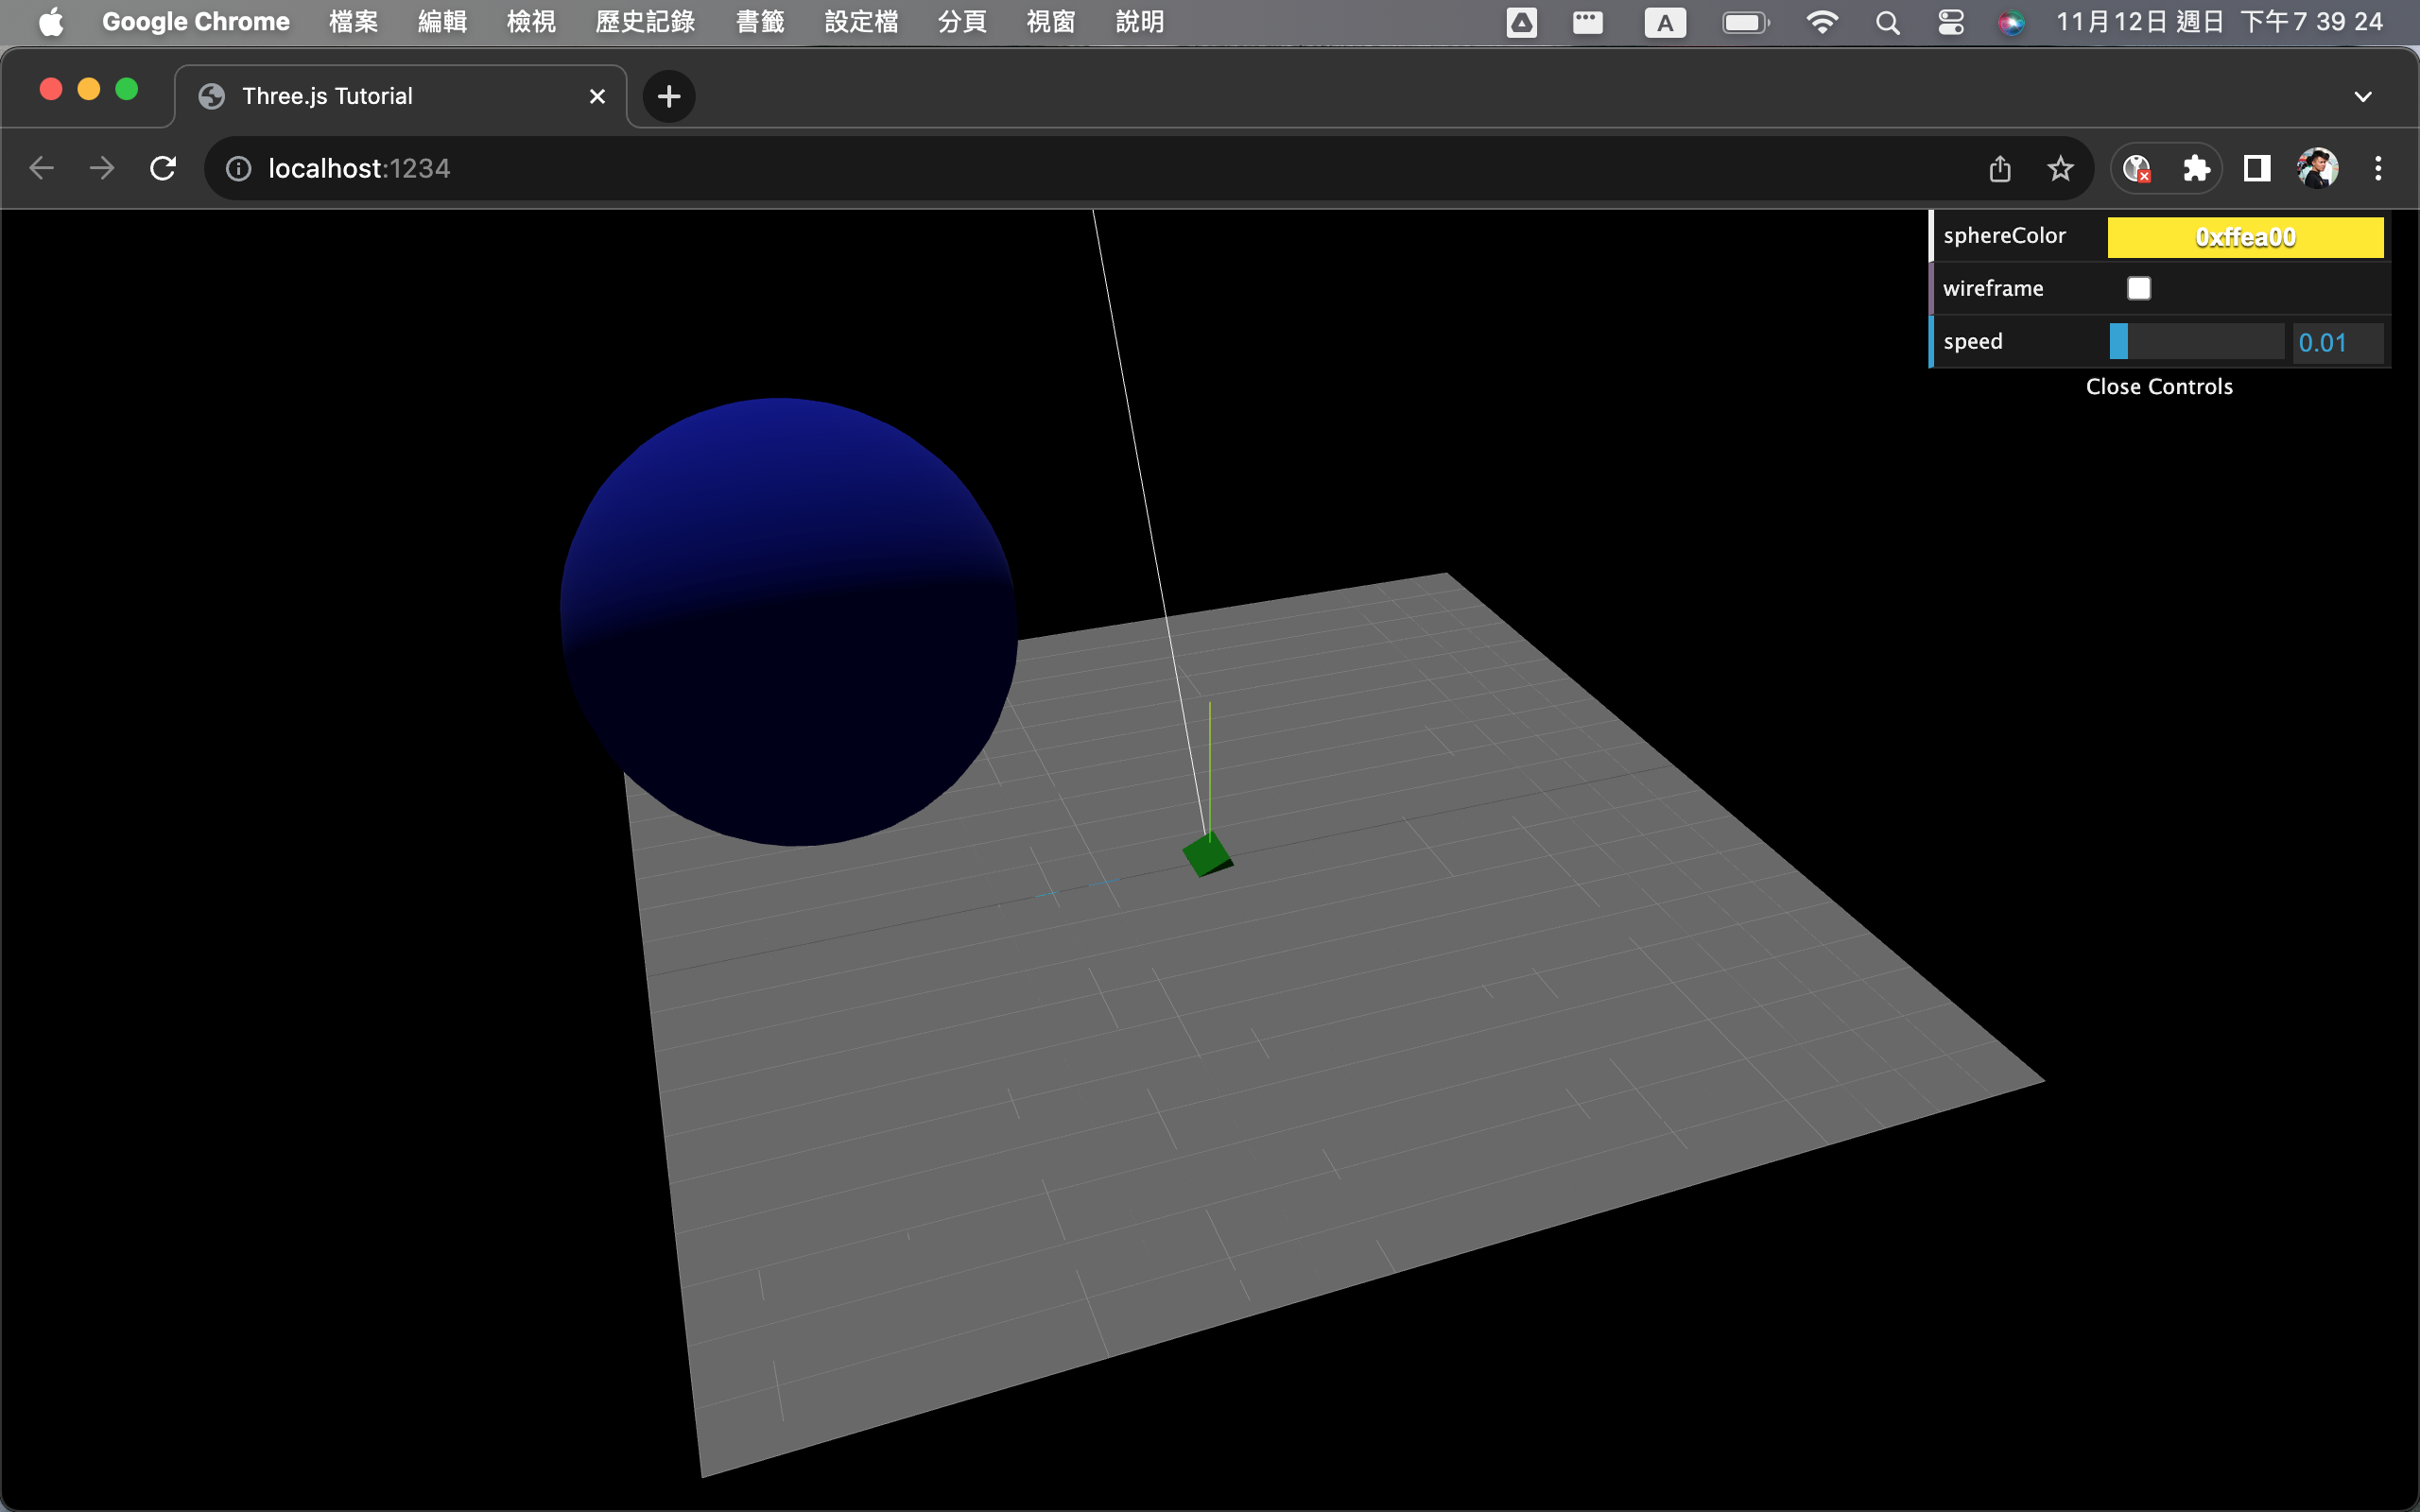
// 建立環境光源, 0x333333 是光源的顏色
const ambientLight = new THREE.AmbientLight(0x333333);
scene.add(ambientLight);
// 建立平行光源, 0.8 是光源的強度, 光源的強度是 0.0 ~ 1.0 的值
const directionalLight = new THREE.DirectionalLight(0xffffff, 0.8);
directionalLight.position.set(-30, 50, 0);
scene.add(directionalLight);

// 建立平行光源助手, 其中的參數是平行光源對象, 5 是輔助線的長度
const directionalLightHelper = new THREE.DirectionalLightHelper(directionalLight, 5);
scene.add(directionalLightHelper);這段程式碼創建了兩個光源和一個光源助手。首先,使用THREE.AmbientLight建立了一個環境光源,顏色設置為0x333333。環境光照亮了場景中的所有物體,不考慮方向和位置。接著,使用THREE.DirectionalLight建立了一個平行光源,顏色設置為0xffffff,強度為0.8。平行光源是模擬無窮遠處的光源,具有方向和強度,通常用於模擬太陽光。最後,使用THREE.DirectionalLightHelper建立了一個平行光源助手,參數包括平行光源對象和輔助線的長度。光源助手可以顯示出平行光源的方向和位置,方便調試和可視化光源的效果。
影子
有光的話就會有影子。
import * as THREE from 'three';
import { OrbitControls } from 'three/examples/jsm/controls/OrbitControls.js';
import * as dat from 'dat.gui';

// 建立一個 WebGL 渲染器的程式碼, antialias 是抗鋸齒的意思
const renderer = new THREE.WebGLRenderer({ antialias: true });
// 設定渲染器的尺寸
renderer.setSize(window.innerWidth, window.innerHeight);
// 設定渲染器的解析度
renderer.setPixelRatio(window.devicePixelRatio);
// 設定影子效果
renderer.shadowMap.enabled = true;
// 將 WebGL 渲染器的畫布元素添加到網頁的 body 元素中
document.body.appendChild(renderer.domElement);

// 建立一個場景
const scene = new THREE.Scene();
// 建立一個透視相機
const camera = new THREE.PerspectiveCamera(
    45, // 視野角度
    window.innerWidth / window.innerHeight, //
    0.1, // 視野最近距離
    1000 // 視野最遠距離
);

// 建立一個輔助器
const orbit = new OrbitControls(camera, renderer.domElement);

// 建立三維坐標系輔助器
const axesHelper = new THREE.AxesHelper(5);
scene.add(axesHelper);
// 改變相機的位置
camera.position.set(-10, 30, 30);
// 更新相機的控制器
orbit.update();


// 建立gui
const gui = new dat.GUI();
// 建立一個物件, 用來儲存控制項的資料
const options = {
    sphereColor: 0xffea00,
    wireframe: false,
    speed: 0.01
};
// 將控制項加入gui
gui.addColor(options, 'sphereColor').onChange(function (value) {
    sphere.material.color.set(value);
});
gui.add(options, 'wireframe').onChange(function (value) {
    sphere.material.wireframe = value;
});
gui.add(options, 'speed', 0, 0.1);


// 建立一個立方體
const boxGeometry = new THREE.BoxGeometry();
const boxMaterial = new THREE.MeshStandardMaterial({ color: 0x00ff00 });
const box = new THREE.Mesh(boxGeometry, boxMaterial);
scene.add(box);

// 建立一個平面
const planeGeometry = new THREE.PlaneGeometry(30, 30);
const planeMaterial = new THREE.MeshStandardMaterial({
    color: 0xcccccc, side: THREE.DoubleSide
});
const plane = new THREE.Mesh(planeGeometry, planeMaterial);
plane.receiveShadow = true;
scene.add(plane);
plane.rotation.x = -Math.PI / 2;

// 建立網格, 30 是網格的大小, 20 是網格的分段數
const gridHelper = new THREE.GridHelper(30, 20);
scene.add(gridHelper);

// 建立一個球體, 5 是球體的半徑, 30, 30 是球體的寬度分段數和高度分段數
const sphereGeometry = new THREE.SphereGeometry(5, 30, 30);
const sphereMaterial = new THREE.MeshStandardMaterial({
    color: 0x0000FF, wireframe: false
});
const sphere = new THREE.Mesh(sphereGeometry, sphereMaterial);
sphere.position.set(-10, 10, 0);
sphere.castShadow = true;
scene.add(sphere);

// 建立環境光源, 0x333333 是光源的顏色
const ambientLight = new THREE.AmbientLight(0x333333);
scene.add(ambientLight);
// 建立平行光源, 0.8 是光源的強度, 光源的強度是 0.0 ~ 1.0 的值
const directionalLight = new THREE.DirectionalLight(0xffffff, 0.8);
directionalLight.position.set(-30, 50, 0);
directionalLight.castShadow = true;
scene.add(directionalLight);

// 建立平行光源助手, 其中的參數是平行光源對象, 5 是輔助線的長度
const directionalLightHelper = new THREE.DirectionalLightHelper(directionalLight, 5);
scene.add(directionalLightHelper);

let step = 0;

function animate(time) {
    box.rotation.x = time / 1000;
    box.rotation.y = time / 1000;

    step += options.speed;
    sphere.position.y = 10 * Math.abs(Math.sin(step));

    // 將場景渲染到畫布元素上的函式
    renderer.render(scene, camera);
}
renderer.setAnimationLoop(animate);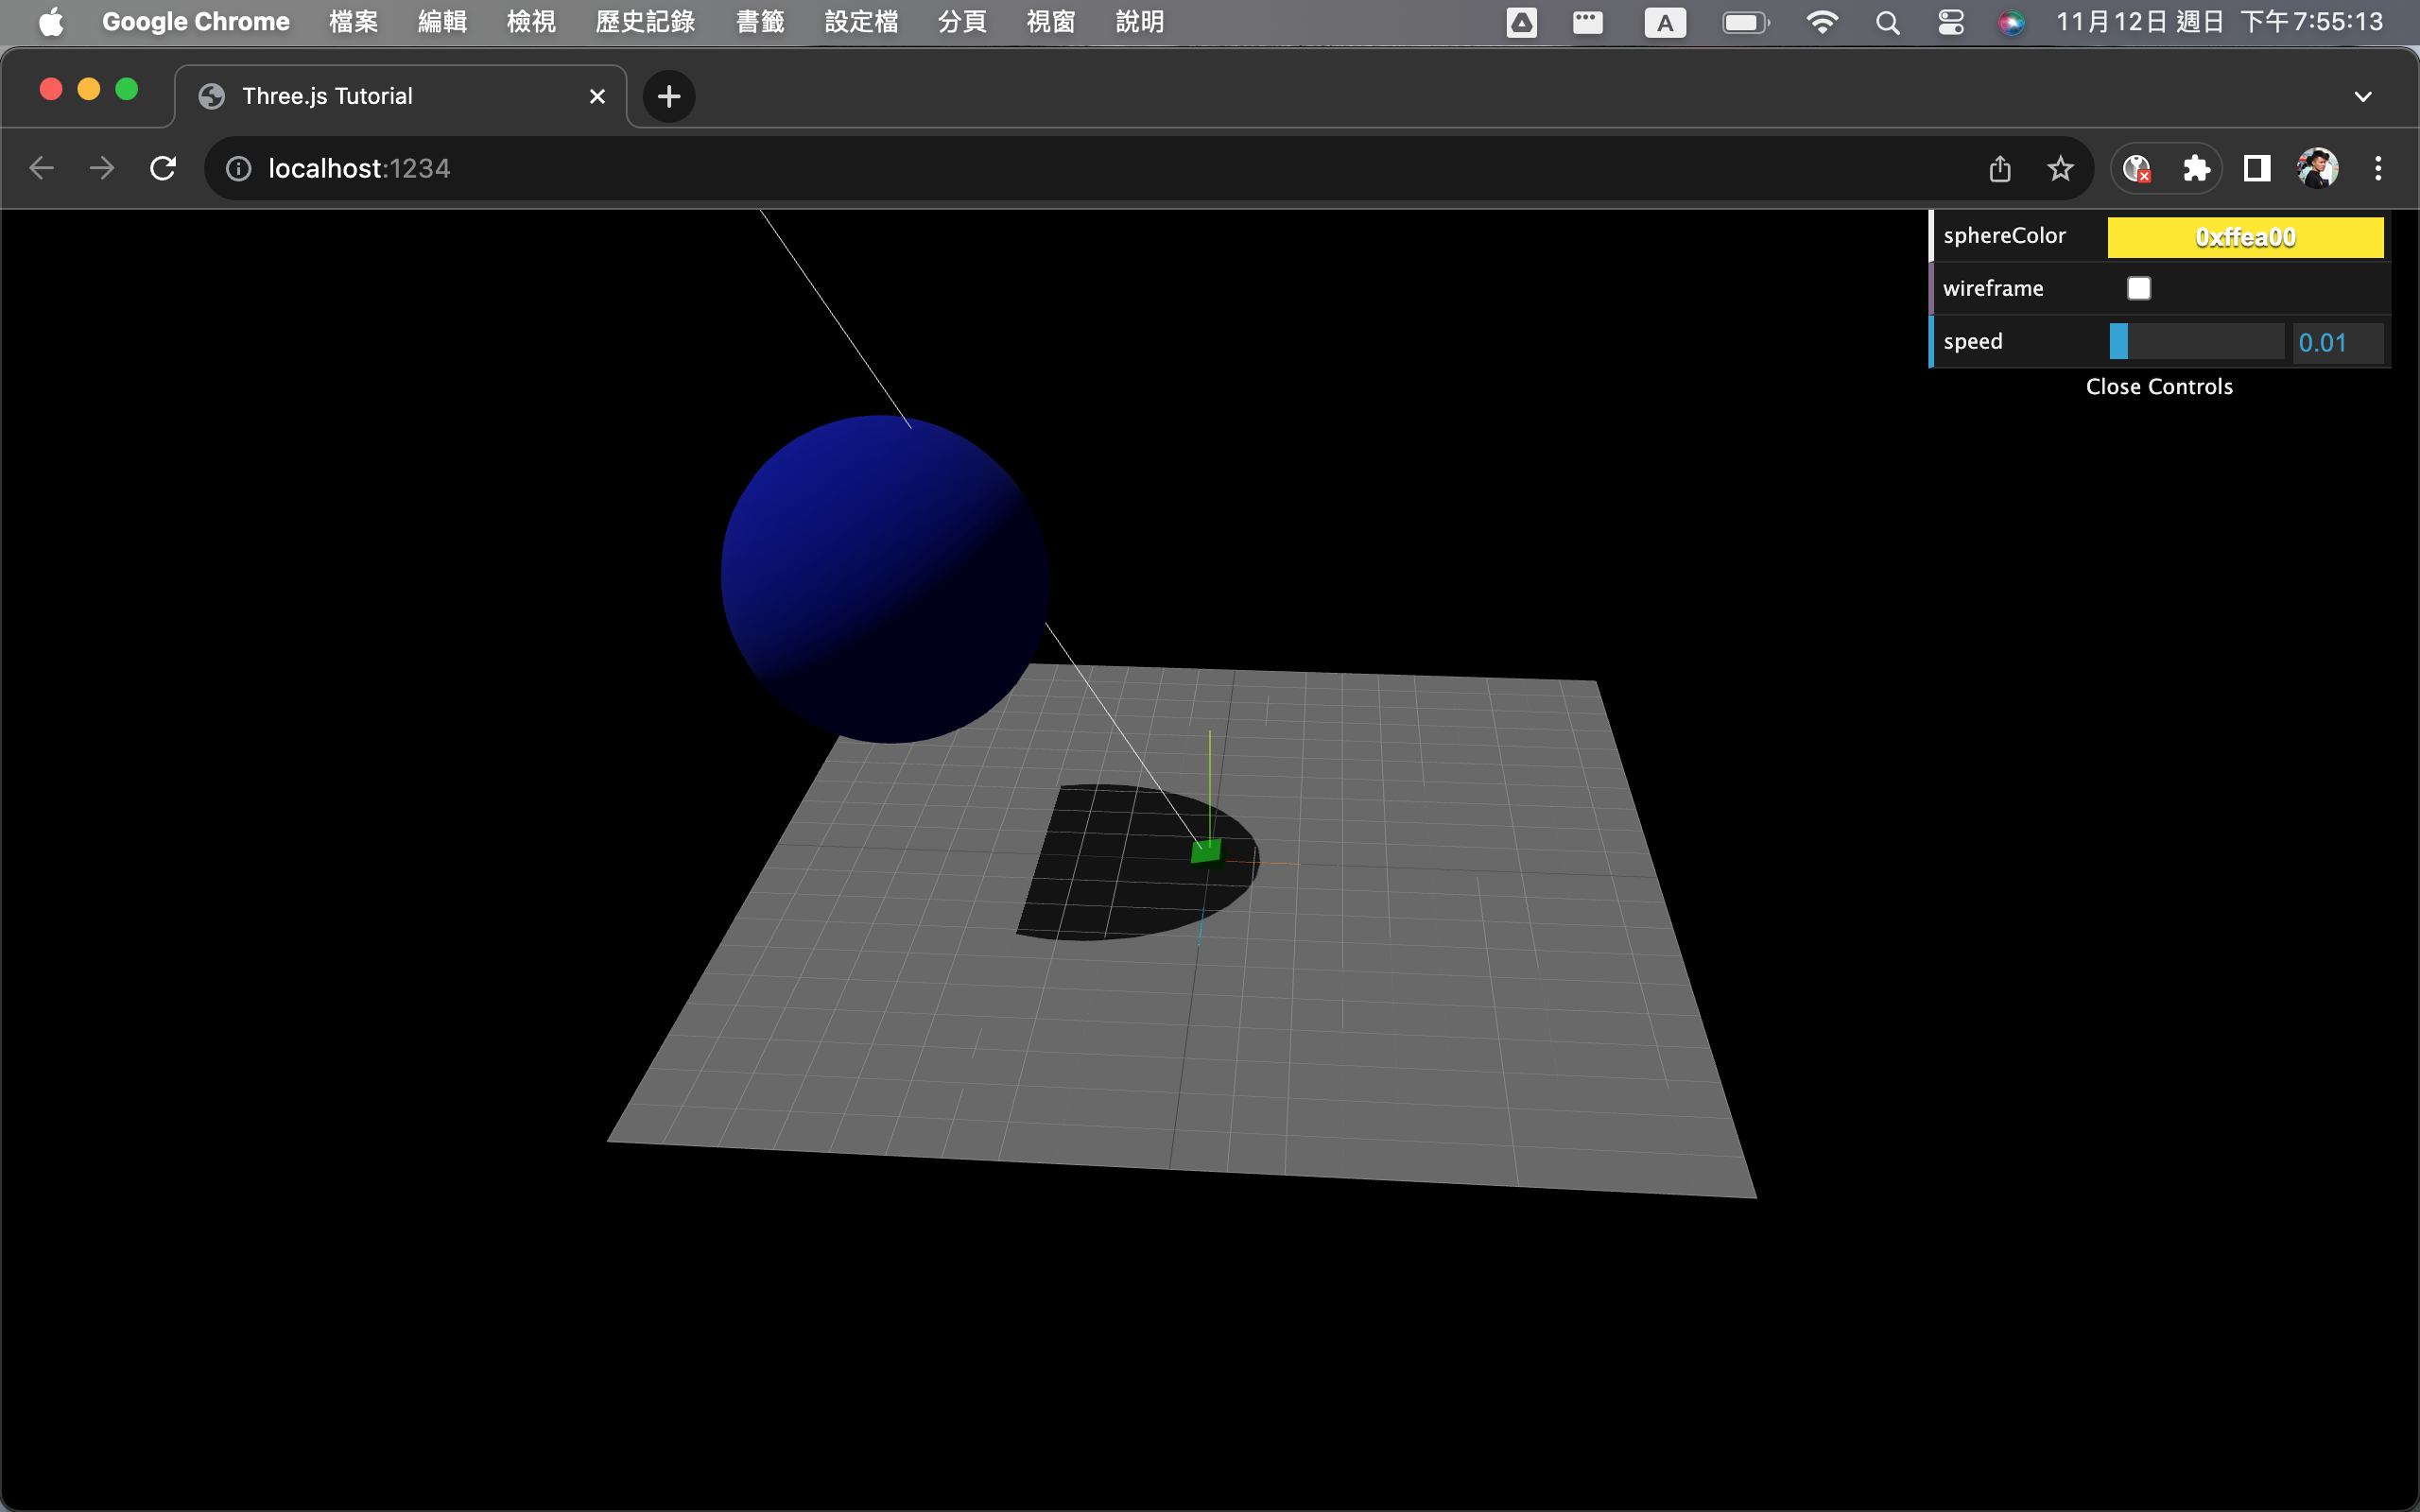
renderer.shadowMap.enabled = true;
plane.receiveShadow = true;
sphere.castShadow = true;
directionalLight.castShadow = true;這段程式碼涉及到Three.js中的陰影 (shadow) 相關設置。
renderer.shadowMap.enabled = true;:這行程式碼啟用了渲染器的陰影功能。它告訴渲染器在渲染場景時生成陰影效果。plane.receiveShadow = true;:這行程式碼設置了一個平面物體(例如地板)接收陰影。當其他物體投射陰影時,平面物體將能夠接收並顯示這些陰影。sphere.castShadow = true;:這行程式碼設置了一個球體物體(例如球)投射陰影。它告訴Three.js該物體需要在場景中產生陰影。directionalLight.castShadow = true;:這行程式碼設置了一個平行光源投射陰影。它告訴該平行光源需要在場景中產生陰影。這通常用於模擬太陽光,因為太陽光可以產生長距離的平行光線,從而產生物體的陰影效果。
但如你所見,這個show有點奇怪,這是因為光源也是用carema
使用shadowHelper和增長影子camera
import * as THREE from 'three';
import { OrbitControls } from 'three/examples/jsm/controls/OrbitControls.js';
import * as dat from 'dat.gui';

// 建立一個 WebGL 渲染器的程式碼, antialias 是抗鋸齒的意思
const renderer = new THREE.WebGLRenderer({ antialias: true });
// 設定渲染器的尺寸
renderer.setSize(window.innerWidth, window.innerHeight);
// 設定渲染器的解析度
renderer.setPixelRatio(window.devicePixelRatio);
// 設定影子效果
renderer.shadowMap.enabled = true;
// 將 WebGL 渲染器的畫布元素添加到網頁的 body 元素中
document.body.appendChild(renderer.domElement);

// 建立一個場景
const scene = new THREE.Scene();
// 建立一個透視相機
const camera = new THREE.PerspectiveCamera(
    45, // 視野角度
    window.innerWidth / window.innerHeight, //
    0.1, // 視野最近距離
    1000 // 視野最遠距離
);

// 建立一個輔助器
const orbit = new OrbitControls(camera, renderer.domElement);

// 建立三維坐標系輔助器
const axesHelper = new THREE.AxesHelper(5);
scene.add(axesHelper);
// 改變相機的位置
camera.position.set(-10, 30, 30);
// 更新相機的控制器
orbit.update();


// 建立gui
const gui = new dat.GUI();
// 建立一個物件, 用來儲存控制項的資料
const options = {
    sphereColor: 0xffea00,
    wireframe: false,
    speed: 0.01
};
// 將控制項加入gui
gui.addColor(options, 'sphereColor').onChange(function (value) {
    sphere.material.color.set(value);
});
gui.add(options, 'wireframe').onChange(function (value) {
    sphere.material.wireframe = value;
});
gui.add(options, 'speed', 0, 0.1);


// 建立一個立方體
const boxGeometry = new THREE.BoxGeometry();
const boxMaterial = new THREE.MeshStandardMaterial({ color: 0x00ff00 });
const box = new THREE.Mesh(boxGeometry, boxMaterial);
scene.add(box);

// 建立一個平面
const planeGeometry = new THREE.PlaneGeometry(30, 30);
const planeMaterial = new THREE.MeshStandardMaterial({
    color: 0xcccccc, side: THREE.DoubleSide
});
const plane = new THREE.Mesh(planeGeometry, planeMaterial);
plane.receiveShadow = true;
scene.add(plane);
plane.rotation.x = -Math.PI / 2;

// 建立網格, 30 是網格的大小, 20 是網格的分段數
const gridHelper = new THREE.GridHelper(30, 20);
scene.add(gridHelper);

// 建立一個球體, 5 是球體的半徑, 30, 30 是球體的寬度分段數和高度分段數
const sphereGeometry = new THREE.SphereGeometry(5, 30, 30);
const sphereMaterial = new THREE.MeshStandardMaterial({
    color: 0x0000FF, wireframe: false
});
const sphere = new THREE.Mesh(sphereGeometry, sphereMaterial);
sphere.position.set(-10, 10, 0);
sphere.castShadow = true;
scene.add(sphere);

// 建立環境光源, 0x333333 是光源的顏色
const ambientLight = new THREE.AmbientLight(0x333333);
scene.add(ambientLight);
// 建立平行光源, 0.8 是光源的強度, 光源的強度是 0.0 ~ 1.0 的值
const directionalLight = new THREE.DirectionalLight(0xffffff, 0.8);
directionalLight.position.set(-30, 50, 0);
directionalLight.castShadow = true;
directionalLight.shadow.camera.bottom = -12;
scene.add(directionalLight);

// 建立平行光源助手, 其中的參數是平行光源對象, 5 是輔助線的長度
const directionalLightHelper = new THREE.DirectionalLightHelper(directionalLight, 5);
scene.add(directionalLightHelper);

// 建立影子助手
const dLightShadowHelper = new THREE.CameraHelper(directionalLight.shadow.camera);
scene.add(dLightShadowHelper);


let step = 0;

function animate(time) {
    box.rotation.x = time / 1000;
    box.rotation.y = time / 1000;

    step += options.speed;
    sphere.position.y = 10 * Math.abs(Math.sin(step));

    // 將場景渲染到畫布元素上的函式
    renderer.render(scene, camera);
}
renderer.setAnimationLoop(animate);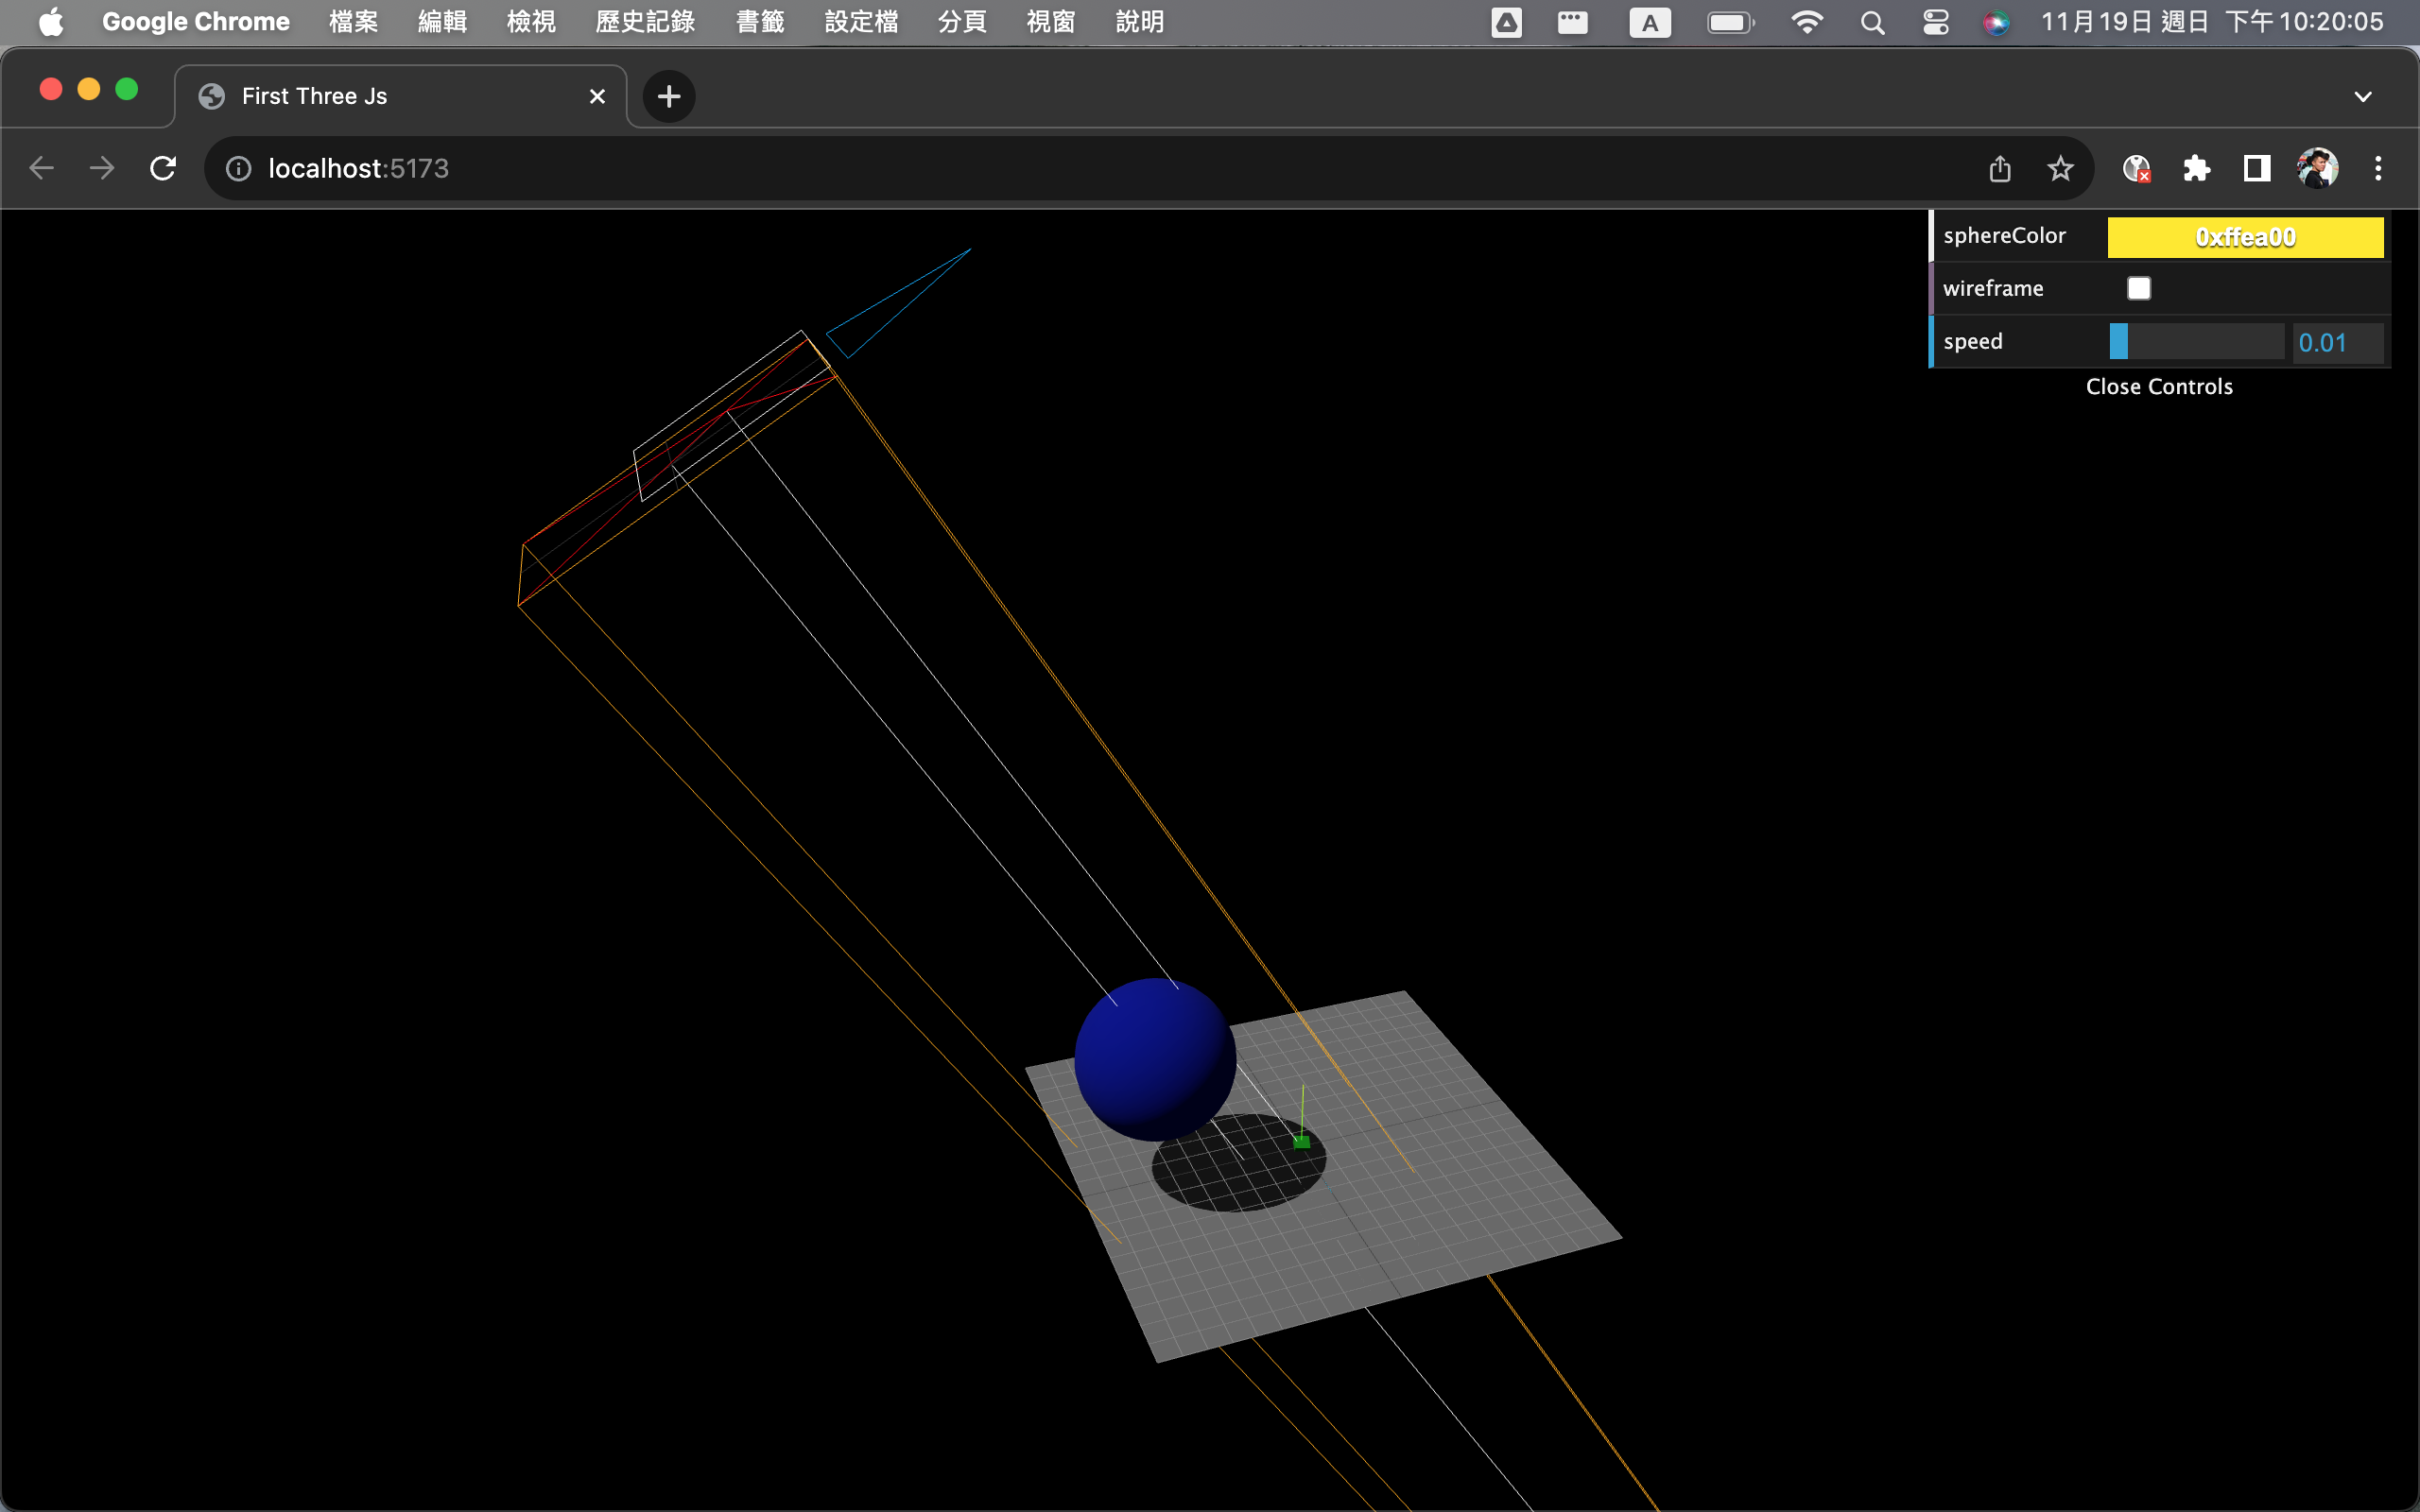
- 在平行光源(Directional Light)的設定中,新增了一行程式碼 :
directionalLight.shadow.camera.bottom = -12;這行程式碼是設定平行光源的陰影攝影機的底部位置為-12。這樣可以調整陰影的投射範圍,使得陰影能夠更準確地投射在物體上。
2.. 新增了一個影子助手(Shadow Helper),程式碼如下:
const dLightShadowHelper = new THREE.CameraHelper(directionalLight.shadow.camera);
scene.add(dLightShadowHelper);影子助手可以幫助我們視覺化陰影的投射範圍,對於調整陰影效果非常有幫助。這個助手會根據平行光源的陰影攝影機的設定來顯示一個可視化的框,這個框就代表了陰影的投射範圍。這樣我們就可以清楚地知道陰影會投射在哪裡,並且可以根據需要來調整陰影攝影機的設定。這對於調整場景的燈光和陰影效果非常有幫助。