1.3 analog input
本章包含兩節:
analogRead(),即用Arduino讀取analog訊號,同時亦會介紹Seriallibrary。analog calibration,即初始化,用程式去初始化讀取的靈敏度。
analogRead()
效果
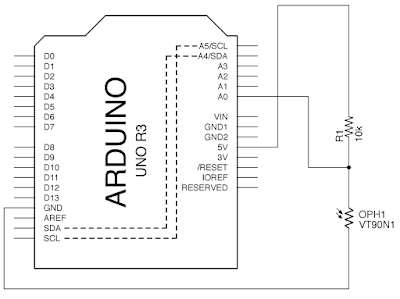
用Arduino讀取光敏電阻的電壓值,再在電腦列出來。上傳完畢請按下Ardunio IDE介面右上角像放大鏡的Serial監視器。
電路圖

程式碼
x1void setup(){2 Serial.begin(115200);3 pinMode(A0, INPUT);4}5
6void loop(){7 int voltage = analogRead(A0);8 //Or you can type pin 14 for A0, pin 15 for A1, etc.9 Serial.print("The voltage is:");10 Serial.println(voltage);11 delay(100);12}說明
int voltage = analogRead(A0); : 用Arduino的A0腳位,讀取analog數值,儲存在變數voltage中。

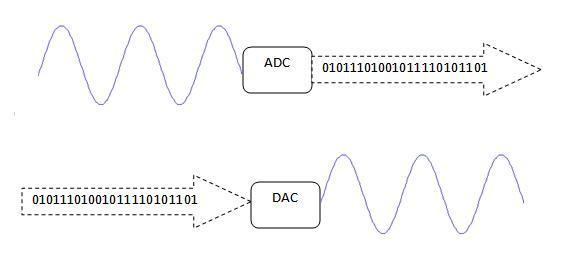
Arduino微控制器是digital的,在微控制器的世界裡只有0(LOW)和1(HIGH),不是0就是1,但現實世界的資訊都是analog的,例如聲音,光度,距離,溫度等等,要和現實世界互動,就需要把analog的訊號變成digital,這元件稱之為ADC(analog-digital-converter)。
Arduino內建了6隻腳位(A0 - A5)(或用pin 14- pin 19表示),能讀取analog訊號。解柝度為10-bits,即可將5V分成1024級, 讀到0V,出來的數值是0;讀到5V, 就應該是1024。但由於最大只有1023,所以數值是1023。而讀到3.75V,就是:
相反,如果是讀到512,那實際的電壓是:

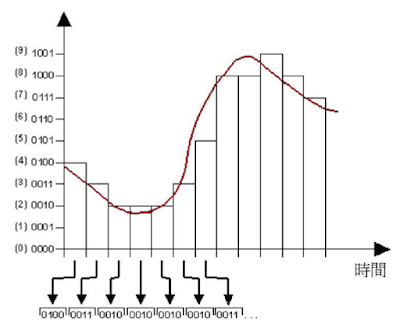
上圖中,橫軸的取樣時間稱為sample time,而取樣的密度就是sample rate,sample rate即每秒取樣多少次,數字越大即取樣越密,還原當然越好,但資訊量會大很多。而直軸的密度就叫resolution,解柝度,以bit為單位,上圖是4-bits,所以有0-15共16個級數(圖中只顯示0-9,但實際應該是0-15的)。
Arduino的內置ADC,resolution有10-bits, 即有1024個等級,而sample rate就視乎你寫的程式有否delay和程式的長度,但最好每次loop()預留10ms給Arduino作為資料傳輸。
Serial.begin(115200); : Serial是串行通訊的library,Arduino IDE本身已內置的library之一。Arduino通過USB線,與電腦通訊,通訊的單位是byte,與電腦通訊其間會佔用了pin 0 和pin 1,當然,上傳程式至Arduino時都會佔用到,所以,如無特別,留空Arduino的pin 0和pin 1以免程式不能上傳和影響通訊。
115200是通訊速度,即115200bps,常用的Serial傳輸速度,Serial需要透過雙方事先協定一樣的速度。如果開了Serial監視器,出了很多奇怪的文字,那確認一下Serial監視器右下角的通訊速度是否115200bps。
xxxxxxxxxx21Serial.print("The voltage is:");2Serial.println(voltage);print跟println最大的分別是:print沒有隔行,而println在列印出時會順便按下enter,變成在下一行再列出新的數值。
analog calibration
效果
按下serial監視器後,首五秒鐘請盡量讓光敏電阻感受環境下的最光與最暗,讓Arduino記錄。五秒之後就會得出經調整的光度百分比。
電路圖

程式碼
xxxxxxxxxx331int sensorPin = A0; 2
3int sensorValue = 0;4int sensorMin = 1023; 5int sensorMax = 0;6
7void setup() {8    Serial.begin(115200);9    // turn on LED to signal the start of the calibration period:10    pinMode(13, OUTPUT);11    digitalWrite(13, HIGH);12
13    // calibrate during the first five seconds 14    while (millis() < 5000) {15        sensorValue = analogRead(sensorPin);16        if (sensorValue > sensorMax) {17            sensorMax = sensorValue;18        }19        if (sensorValue < sensorMin) {20            sensorMin = sensorValue;21        }22    }23    // signal the end of the calibration period24    digitalWrite(13, LOW);25}26
27void loop() {28    sensorValue = analogRead(sensorPin);29    sensorValue = map(sensorValue, sensorMin, sensorMax, 0, 100);30    sensorValue = constrain(sensorValue, 0, 100);31    Serial.print(sensorValue);32    Serial.println("%");33}
說明
xxxxxxxxxx31int sensorValue = 0;2int sensorMin = 1023; 3int sensorMax = 0;宣告三個變數:sensorValue用來紀錄A0腳讀到的數值;sensorMin用來紀錄最少值;sensorMax用來紀錄最大值。一開始時刻意將min設做1023,max設做0。(今次需要用int需不用byte,因數值大於255。)
xxxxxxxxxx91while (millis() < 5000) {2 sensorValue = analogRead(sensorPin);3 if (sensorValue > sensorMax) {4 sensorMax = sensorValue;5 }6 if (sensorValue < sensorMin) {7 sensorMin = sensorValue;8 }9}首五秒,讀取sensor所在的腳位,如果大於max,則更新max值,如果少於min,則更新min值。只要在首五秒讓光敏電阻感受環境中的最光和最暗值,就能把兩個min, max的差異擴大。
sensorValue = map(sensorValue, sensorMin, sensorMax, 0, 100); : map是用來將sensorValue 跟據比例縮放,由原本最大最少值是sensorMax和sensorMin,變成0至100。詳見這裡。
sensorValue = constrain(sensorValue, 0, 100); : costrain則是用來限制sensorValue的上下限,保存在0-100之內,即使多於100, 最大值還是100。詳見這裡。